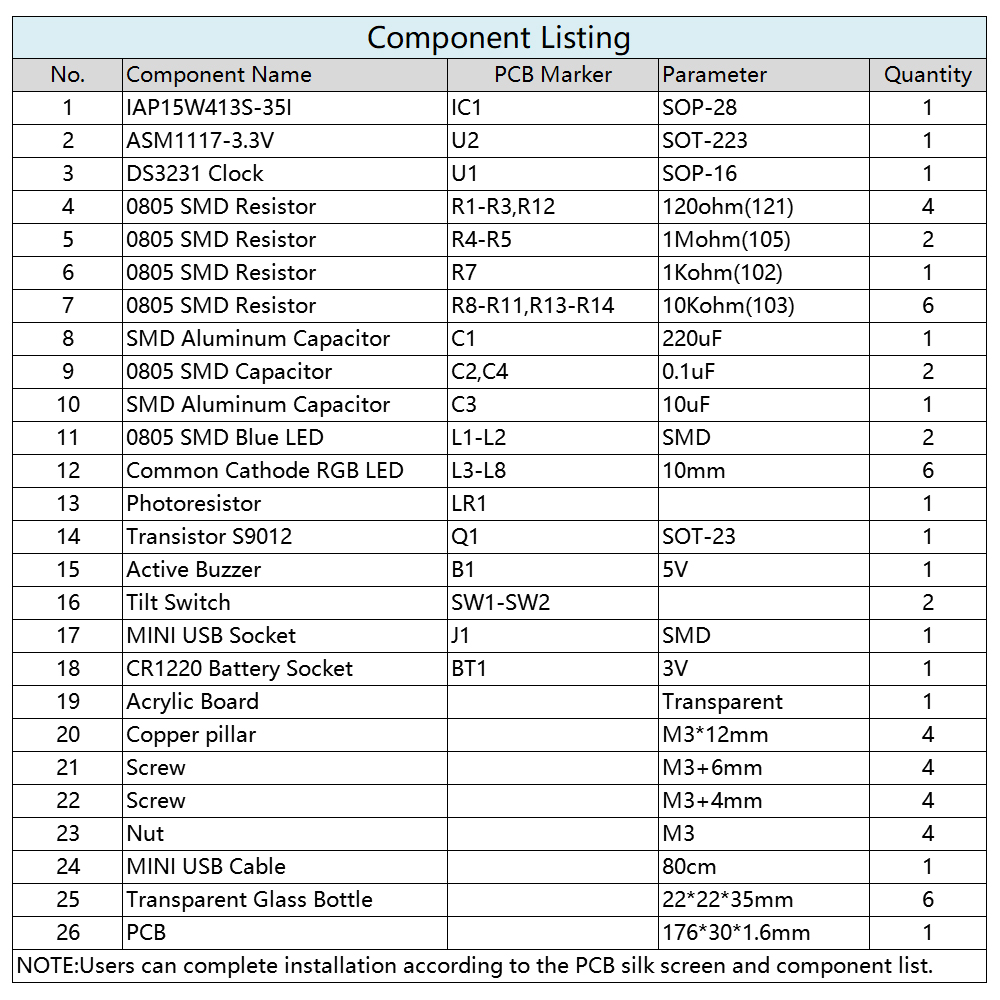
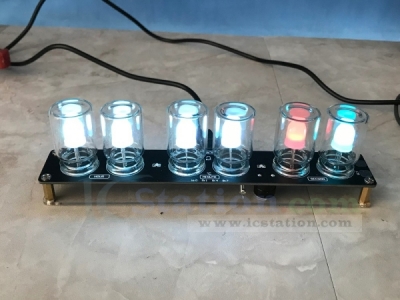
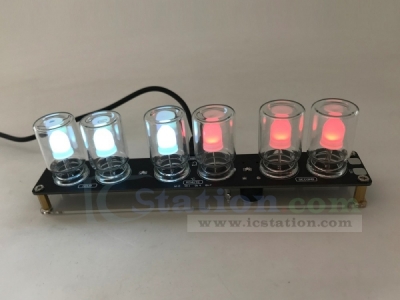
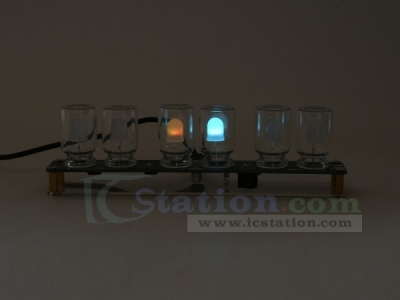
Not all clocks use digits to display the time. This neat little clock tells you the time by using different colour for each digit. The colour are based on the resistor colour code.So DIY user It should be quite easy to read for most electronics and more mysterious.
2.Feature:
1>.Touch button control
2>.RGB LED full color
3>.DIY manual welding
4>.Simple and easy to operate
5>.Tilt sensor induction
6>.Power off memory function
7>.Colors replace numbers
8>. Automatically adjust the LED brightness according to the ambient light
9>.High permeability small glass bottle enhances the refraction effect
10>.Color display time and Binary display time
11>.Display time and current temperature
3.Parameter:
1>.Work Voltage:DC 5V
2>.Work Current:50mA
3>.Work Module:Touch Button Control
4>.Work Temperature:-40℃~85℃
5>.Work Humidity:0%~95%RH
6>.Size(Installed):176*30*50mm
4.Set Mode:
1>.The default display time when placed horizontally.
2>.Switch display current temperature:Press SET or ADD button to switch display current temperature in Celsius about 3second when placed horizontally.
3>.Hourly Alarm Function: Dump forward and then press ADD button.The buzzer will sound an alarm when turn on this function when the time is hour such as 8:00.
4>.Set or Calibration time: Dump forward and then press SET button enter into set time. The press ADD and SET button to change time value.
5>.Alarm Clock Function: Dump backward and then press ADD button to turn ON this function. Next press SET button to set alarm clock time such as 8:10. Two SMD LED will turn ON if enable this function.Press any button to stop the alarm.
6>.Binary Display Time: Upside down to display time in binary.Pink means hours and Cyan means minutes.
5.Color Code:
0>.White means 0
1>.Red means 1
2>.Orange means 2
3>.Yellow means 3
4>.Green means 4
5>.Indigo means 5
6>.Cyan means 6
7>.Blue means 7
8>.Purple means 8
9>.Pink means 9
6.Application:
1>.Training welding skills
2>.Student school
3>.DIY production
4>.Project Design
5>.Electronic competition
6>.Gift giving
7>.Crafts collection
8>.Home decoration
9>.Souvenir collection
10>.Graduation design
11>.Holiday gifts
7.Installation Tips:
1>.User needs to prepare the welding tool at first.
2>.Please be patient until the installation is complete.
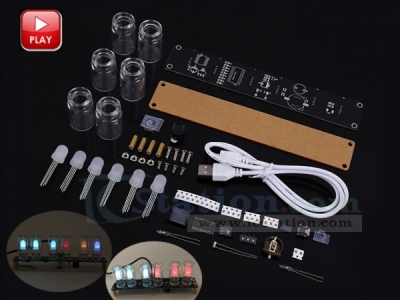
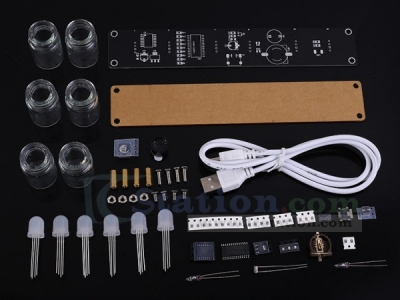
3>.The package is DIY kit.It need finish install by user.
4>.The soldering iron can't touch the components for a long time(1.0 second), otherwise it will damage the components.
5>.Pay attention to the positive and negative of the components.
6>.Strictly prohibit short circuit.
7>.User must install the LED according to the specified rules.Otherwise some LED will not light.
8>.Install complex components preferentially.
9>.Make sure all components are in right direction and right place.
10>.Check that all of the LED can be illuminated.
11>.It is strongly recommended to read the installation manual before starting installation!!!
8.Installation Steps(Please be patient install!!!):
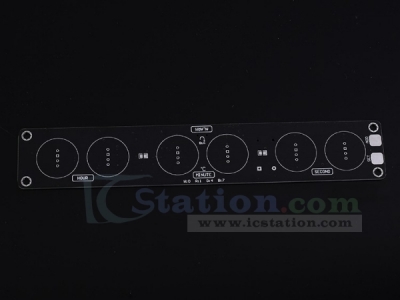
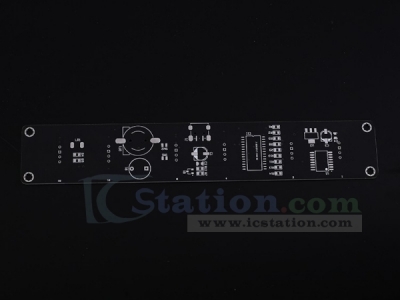
Step 1: Install 1pcs IAP15W413S-35I SOP-28 at IC1.There is a dot on one corner of the IC and there is a black dot on PCB where the IC can place on.These two marks are corresponding to each other and are used to specify the installation direction of the IC.
Step 2: Install 1pcs SOP-16 DS3231 Clock at U1 as the same method.
Step 3: Install 1pcs SOT-223 ASM1117-3.3V at U2.
Step 4: Install 1pcs SOT-23 Transistor S9012 at Q1.
Step 5: Install 4pcs 120ohm(121) 0805 SMD Resistor at R1-R3,R12.
Step 6: Install 2pcs 1Mohm(105) 0805 SMD Resistor at R4-R5.
Step 7: Install 1pcs 1Kohm(102) 0805 SMD Resistor at R7.
Step 8: Install 6pcs 10Kohm(103) 0805 SMD Resistor at R8-R11,R13-R14.
Step 9: Install 1pcs 0.1uF 0805 SMD Capacitor at C2,C4.
Step 10: Install 1pcs MINI USB Female Socket at J1.
Step 11: Install 1pcs 10uF SMD Aluminum Capacitor at C3.
Step 12: Install 1pcs 220uF SMD Aluminum Capacitor at C1.
Step 13: Install 1pcs Photoresistor at LR1.No need to distinguish between positive and negative.
Step 14: Install 2pcs Tilt Switch at SW1-SW2.No need to distinguish between positive and negative.
Step 15: Install 1pcs CR1220 Battery Socket at BT1.Users need to prepare battery. The battery is used to save time.
Step 16: Install 1pcs Active Buzzer at B1.Note the positive and negative.
Step 17: Install 3pcs copper pillars as support pillars.
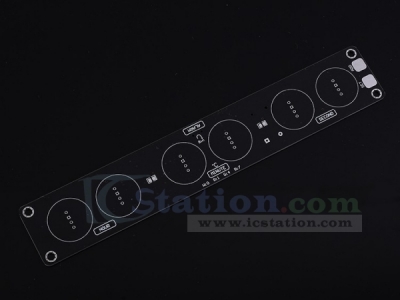
Step 18: Install 2pcs 0805 SMD Blue LED at L1-L2.The green mark on the LED is negative and PCB right is negative.
Step 19: Identify the LED pins. The rectangular pad connects to the longest LED pin.The pins of other LED are inserted into the corresponding pads in sequence.
Step 20: Install the LED at the center point, the height of the LED is controlled at about 25mm.
Step 21: Fix the transparent glass bottle with glue.Users need to prepare their own glue!!!
Step 22: Remove the protective film from the black acrylic surface.
Step 23: Fixed Acrylic Board.
Step 24: Connect to power supply and enjoy the effect.
ICStation doesn't accept any form of pay on delivery. Items used to be shipped after payment. Below are the payment methods we can accept at the moment:
1) Paypal Payment
PayPal is a secure and trusted payment processing service that allows you to shop online. PayPal can be used at icstation.com to purchase items by Credit Card (Visa, MasterCard, Discover, and American Express), Debit Card , or E-check (i.e. using your regular Bank Account).
We are PayPal Verified
2) Bank Transfer / Wire Transfer / T/T
Bank Transfer / Wire Transfer / T/T payment methods are accepted for orders which the total price is up to US$300. The bank will charge about US$50 for the transfer fee if we do the payment in these ways. Feel free to contact us for bank payment details if you need pay via bank.
For other payment method, please contact us at orders@icstation-team.com for more details.