- prev
- next
RGB 4Bit Digital Electronic Clock DIY Kit DC 5V Temperature Alarm 12/24H Time Date Home Clock
| Quantity | 3+ | 5+ | 10+ | 30+ |
| Price | $8.50 | $8.35 | $7.99 | $7.50 |
Product Details
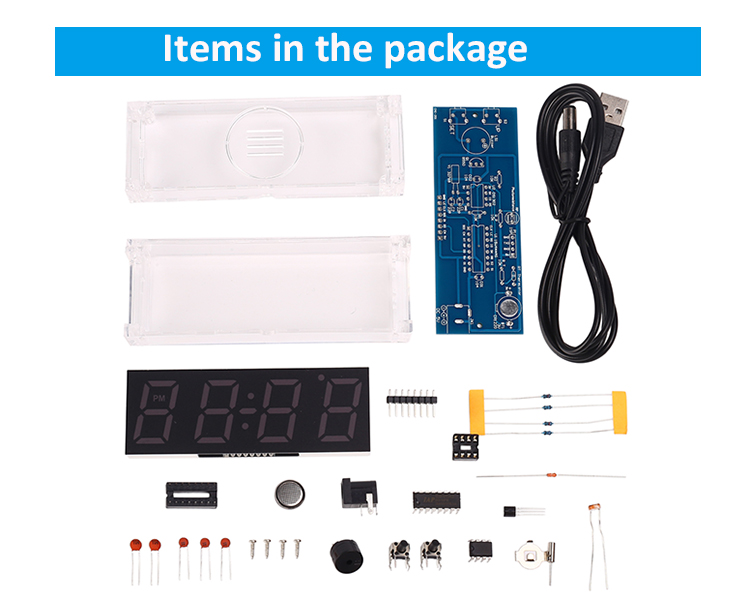
CAI-201 RGB 4Bit Digital Electronic Clock DIY Kit
Project Made by ICStation's Outstanding Partner Fran Cv:
(The language in the video is Spanish)
1.Introduction:
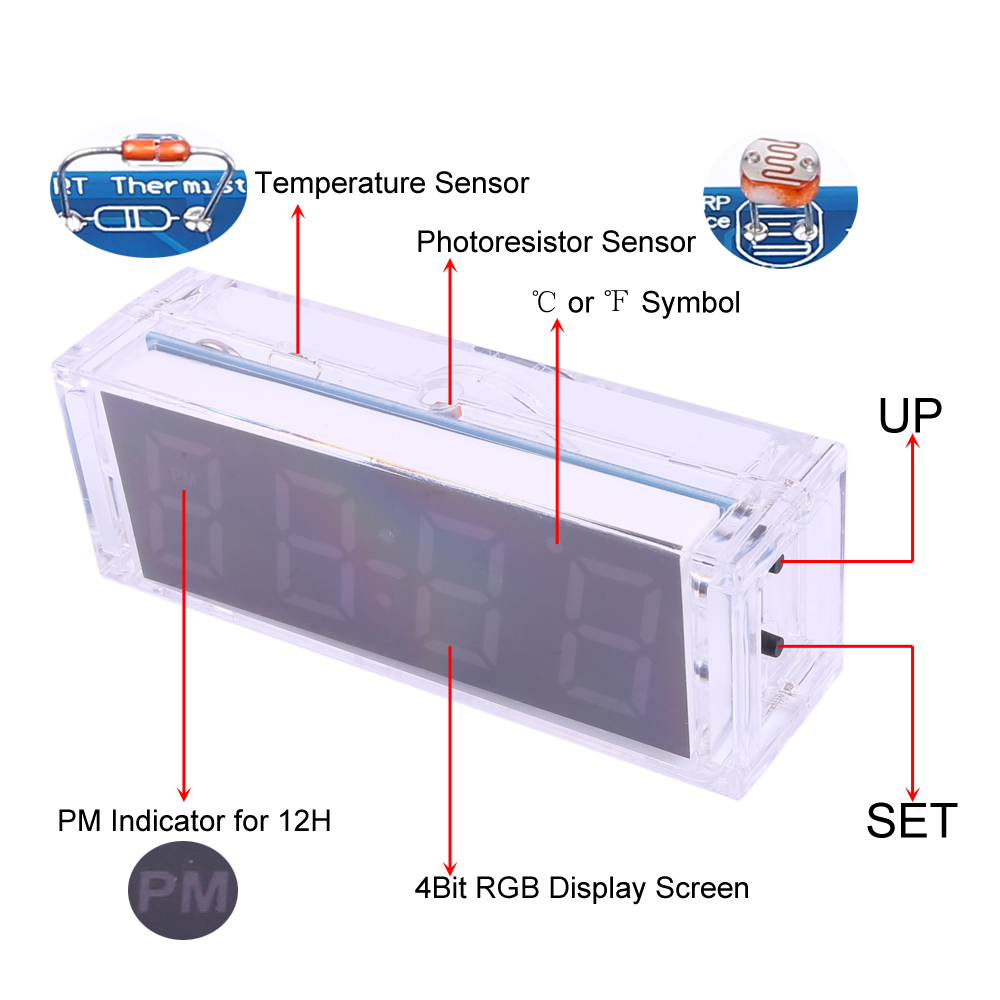
CAI-201 is a RGB 4Bit Digital Electronic Clock DIY Kit. It will display current date, time and temperature in the real time. User can set alarm as your needs. It is easy to operate, beautiful design, very suitable for home or office environment.
2.Feature:
1>.RGB auto color change
2>.Automatic brightness adjustment
3>.Time/Date/Alarm/Temperature
4>.12H or 24H hourly optional system
5>.Time memory function
6>.Temperature can be calibrated
7>.Voice Hourly Report
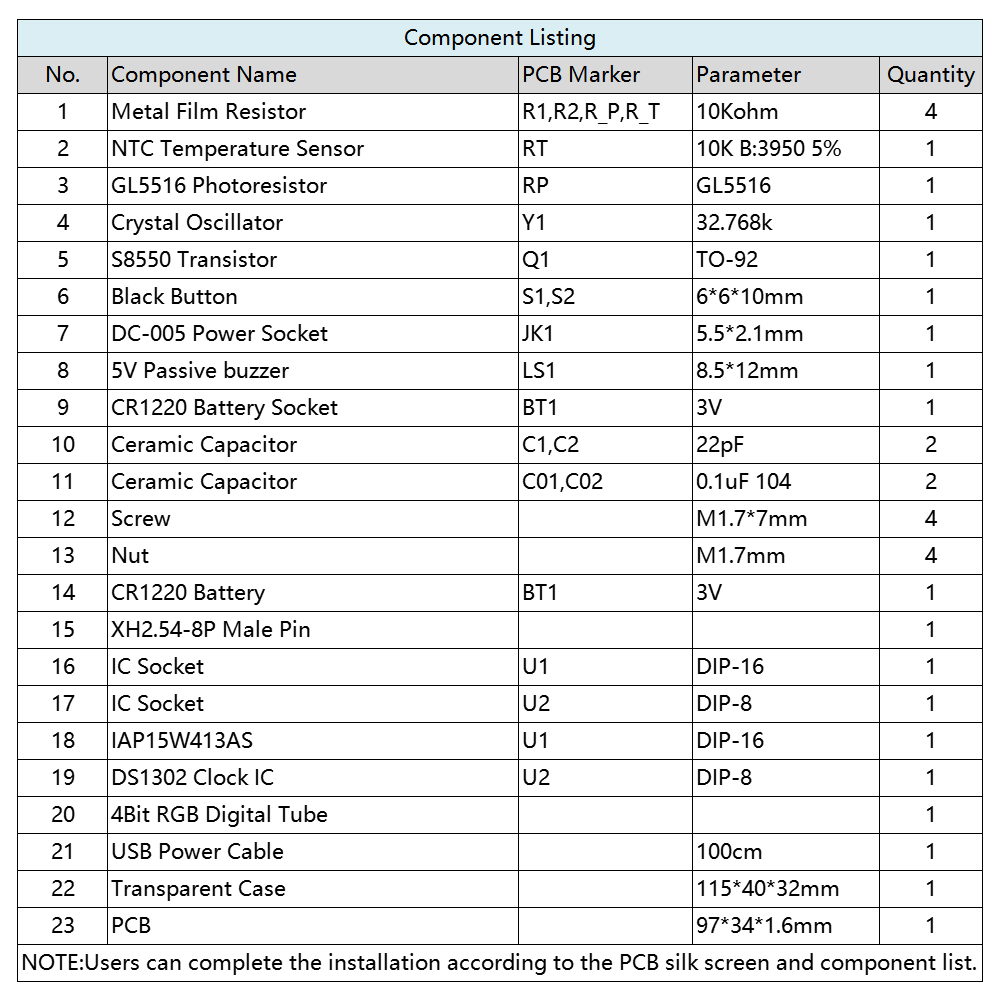
3.Parameter:
1>.Item name: CAI-201 RGB 4Bit Digital Electronic Clock DIY Kit
2>.Model:CAI-201
3>.Work voltage:DC 5V
4>.Work Temperature:-40℃~85℃
5>.Work Humidity:0%~95%RH
6>.Size(Installed):115*40*32mm
4.Main Function:
1>.Reset settings:
Keep press ‘SET’ and ‘UP’ buttons at the same time about 3 second. Then release buttons after screen turn ON and alarm. Factory default settings is 2019.01.01 7:59:50. And after 10 seconds, the alarm will turn ON at 8:00.
2>.Set Method:
2.1>.Keep press ‘SET’ button about 3 seconds enter into set mode.
2.2>.Short press ‘SET’ button to switch set parameter at set mode.The selected parameters will flash automatically.
2.3>.Short press‘UP’ button to increase parameter value.
2.4>.It automatically saves the parameters and exits without any operate in 15 seconds.
3.>.Time mode:
3.1>.12H hourly optional system
3.2>.24H hourly optional system(default)
4>.Hourly Report:
.It can set Hourly Report range such 7-21 which means Hourly Report from 7:00 to 21:00 (default 7-21)
5>. Alarm:
5.1>.A1 alarm: default turn ON.
5.2>.A2 alarm: default turn OFF.
5.3>.A3 alarm: default turn OFF.
6>.Alarm control:
6.1>.oN:E: Daily alarm mode(Alarm from Monday to Sunday and default)
6.2>.--:E: Weekend Holiday mode(Alarm from Monday to Friday)
7>.Automatic adjust brightness:
7.1>.oN-L: Turn ON Automatic brightness control by sensor(default)
7.1>.---L: Turn OFF Automatic brightness control by sensor
8>.Set brightness:
8.1>.This function just can be set when turn OFF automatic adjust brightness.
8.2>.L-3:Set at the brightest
8.3>.L-2:Set at middle brightness
8.4>.L-1:Set at minimum brightness
9>.Calibration temperature: Calibrate the temperature value.
10>.Temperature display unit:
10.1>. C : Display temperature in Celsius degree
10.2>. F : Display temperature in Fahrenheit degree
Please Click Here to download user manual (installation steps and setting method included):
.png)