- prev
- next
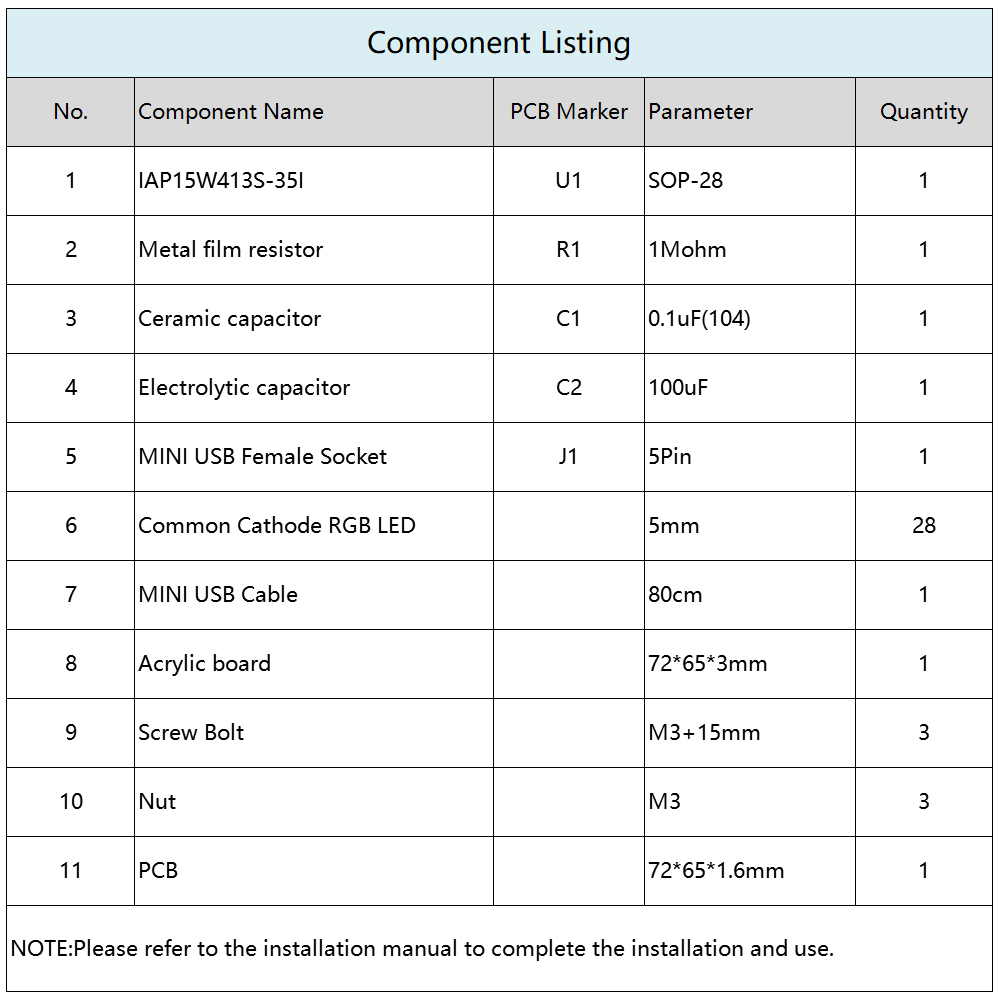
DIY Kit 5mm RGB LED Flashing Lamp Ring Light Module Breathing Light Gradient Color Decorative Lights
$9.79$13.9930%
| Quantity | 3+ | 5+ | 10+ |
| Price | $9.60 | $9.50 | $9.20 |
00d : 00h : 00m : 00s
Item ID: GY18065
Product Details
1.Introduction:
It is a RGB full color LED light cubic ring DIY Kit. It uses 28 high-bright full-color LED.It will produce a variety of cool gradient colors when power ON. The effect will not be affected even in the sun. The whole form an ultra-thin effect. The power off and power on is a high-value artwork.
2.Feature:
1>.28pcs highlight RGB full color LED
2>.23 kinds of display effects
3>.Power off memory function
4>.5mm big LED
5>.Touch control
3.Parameter:
1>.Work Voltage:DC 4.5V~5.5V
2>.Work Current:500mA
3>.Work Module:Automatic and Touch Button Control
4>.Work Temperature:-40℃~85℃
5>.Work Humidity:0%~95%RH
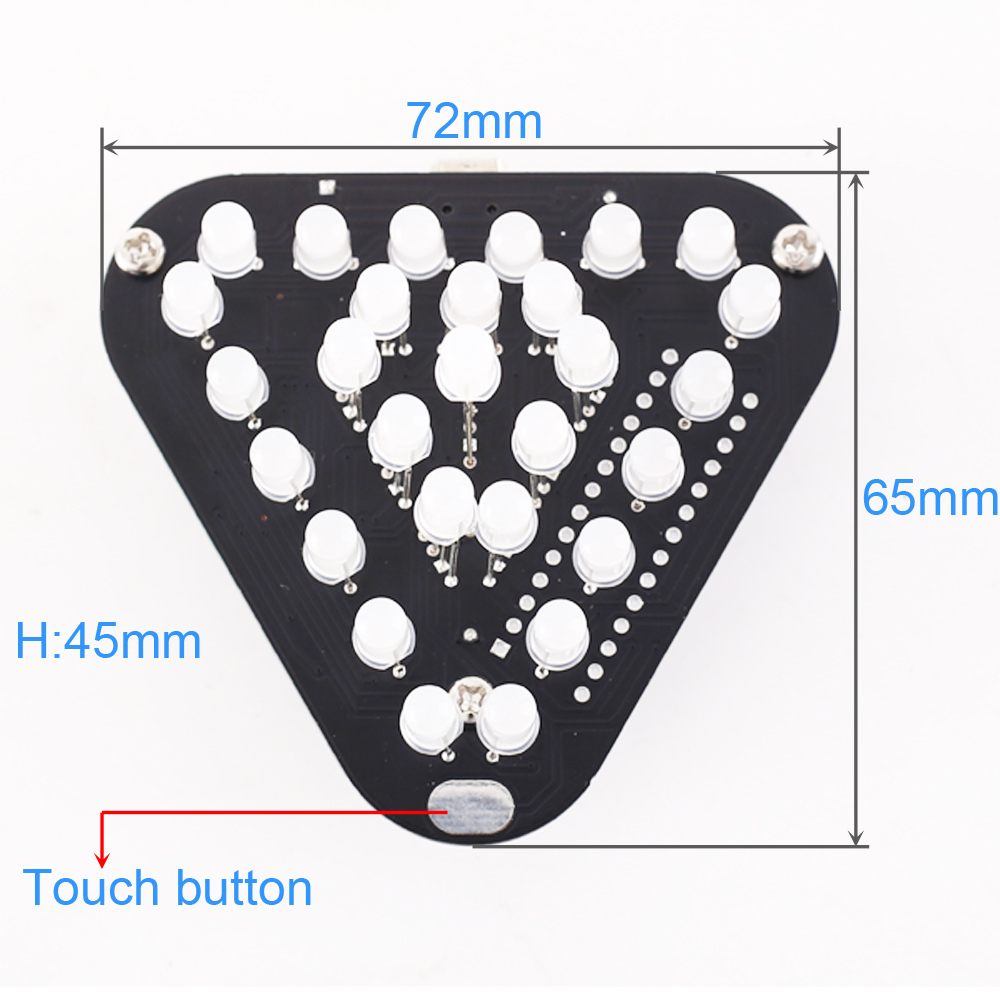
6>.Size(Installed):72*65*45mm
4.Display Mode:
1>.Outward diffusion gradient Aurora LED mode
2>.Clockwise change color of water droplets tailing effect
3>.Anticlockwise water droplets tailing
4>.Layer by layer fade gradually eliminate change color
5>.Each ring LED full-color gradient
6>.Random LED lightning mode
7>.Random 4pcs LED alternately breathing transformation
8>."Y" rotation (Like the English letter Y)
9>.Random layer and color breathing
10>.Three laps LED full-color gradient
11>.Clockwise color effect water droplets tailing
12>.Internal and external diffusion LED Aurora gradient mode
13>.Rainbow gradient mode
14>.A LED color random breath
15>.A variety of all LED breathing patterns
16>.Constantly changing color of water droplets tailing
17>.Random full light and Random Off
18>.Random four color breathing effect
19>.Random color exterminate
20>.All LED full-color gradient
21>.Random 7pcs of all LED after getting brighter gradually eliminate
22>.Random two color water droplets tailing
23>.Random 4pcs LED's "stars" effect
24>.The default code inside the chip, the function is more abundant,So please do not update the code inside arbitrarily!
5.Installation Tips:
1>.User needs to prepare the soldering tool at first. This DIY installation is more difficult to be installed, please be patient until the installation is complete.
2>.The soldering iron can't touch the components for a long time(1.0 second), otherwise it will damage the components.
3>.Pay attention to the positive and negative of the components.
4>.Strictly prohibit short circuit.
5>.User must install the LED according to the specified rules.Otherwise some LED will not light.
6>.Install complex components preferentially.
7>.Make sure all components are in right direction and right place.
8>.Check that all of the LED can be illuminated.
9>.The default code inside the chip, the function is more abundant, so please do not update the code inside arbitrarily!
6.Installation Steps(Please be patient:)
1>.Step 1: Install 1pcs 1Mohm Metal film resistor at R1.
2>.Step 2: Install 1pcs MINI USB Female Socket at J1.
3>.Step 3: Install 1pcs 0.1uF(104) Ceramic capacitor at C1.
4>.Step 4: Install 1pcs 100uF Electrolytic capacitor at C2.The longer pin is positive.
5>.Step 5: Install 3pcs bolts and screws as support pillars in order to install LED.
6>.Step 6: Identify the LED pins. The rectangular pad connects to the longest LED pin.The pins of other LED are inserted into the corresponding pads in sequence.
7>.Step 7: Install outer ring 18pcs LED.Insert the LED in the correct position.Next cut Cut off excess pins.Next Fix the pin with solder and make sure the height of the LED is controlled at about 15mm.
8>.Step 8: Install inner ring 9pcs LED.Insert the LED in the correct position.Next cut Cut off excess pins.Next Fix the pin with solder and make sure the height of the LED is controlled at about 24mm.
9>.Step 9: Install the LED at the center point on the other side of the PCB and make sure the height of the LED is controlled at about 32mm.
10>.Step 10: Install 1pcs DIP-28 IAP15W413S-35I at IC1.There is a dot on one corner of the IC and there is a black dot on PCB where the IC can place on.These two marks are corresponding to each other and are used to specify the installation direction of the IC.
11>.Step 11: Remove the protective film from the acrylic surface.
12>.Step 12: Fixed Acrylic Board by Screw Bolt and Nut.
13>.Step 13: Connect to power supply and enjoy the effect.