
- prev
- next
Music Butterfly Shaped Light DIY Kit White Blue Red Flashing LED Lamp Soldering Kit
$6.29$8.9930%
00d : 00h : 00m : 00s
Item ID: GY18958-2
Product Details
1.Introduction:
This kit contains 57 ultra-bright white LED (nominal brightness 2000-3000mcd), 7 blue LED and 6 red LED arranged to form a butterfly-shaped pattern.
The MCU chip is controlled by a miniature infrared remote control to present multi-state colors.
The light pattern is shining even in the daytime and the effect is still very obvious which coupled with the 13 music performances (monophonic music) that can be easily controlled.
The assembly and production of this kit is relatively simple.
The program has been written into the MCU chip and can be used after installation.
It is a dynamic and interesting gift suitable for expressing love at Christmas, New Year's Day, Spring Festival, Valentine's Day and other festive and warm moments! It can also be installed at home as a lighting lamp and can be changed in various shapes and brightness by remote control.
2.Feature:
70pcs highlight LED
Simple music effect
20 music modes
16 light flashing effects
3.Parameter:
Product Name: Automatic Music Butterfly Lighting DIY Kit
Work Voltage:DC 3.7V~5.5V
Work Current:500mA
Work Temperature:-40℃~85℃
Work Humidity:5%~85%RH
Size(Installed):98*87*15mm
4.Control Instructions:
1.Automatically play music randomly from built-in 20 kinds of music after power on.
2.Automatic random flashing light effects from built-in 16 lighting effects after power on.
5.Application:
1.Training Soldering Skills & hands-on ability
2.School Electronic Course Practice Teaching
3.DIY production
4.Electronic competition
5.Gift giving
6.Crafts collection
7.Home decoration
8.Souvenir collection
9.Graduation design
6.Installation Tips:
1.User needs to prepare the welding tool at first.
2.Please be patient until the installation is complete.
3.The package is DIY kit.It need finish install by user.
4.The soldering iron can't touch the components for a long time(1.0 second), otherwise it will damage the components.
5.Pay attention to the positive and negative of the components.
6.Strictly prohibit short circuit.
7.User must install the LED according to the specified rules.Otherwise some LED will not light.
8.Install complex components preferentially.
9.Make sure all components are in right direction and right place.
10.Check that all of the LED can be illuminated.
11.It is strongly recommended to read the installation manual before starting installation!!!
12.Please wear anti-static gloves or anti-static wristbands when installing electronic components.
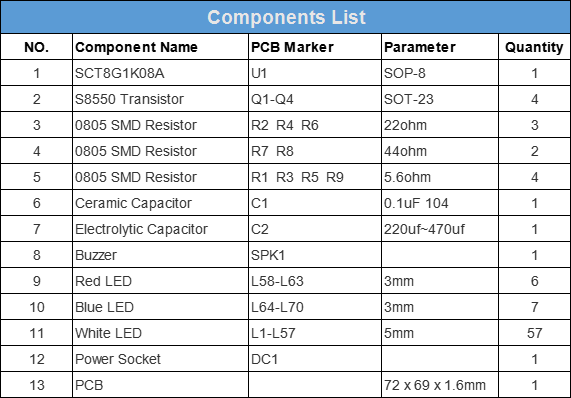
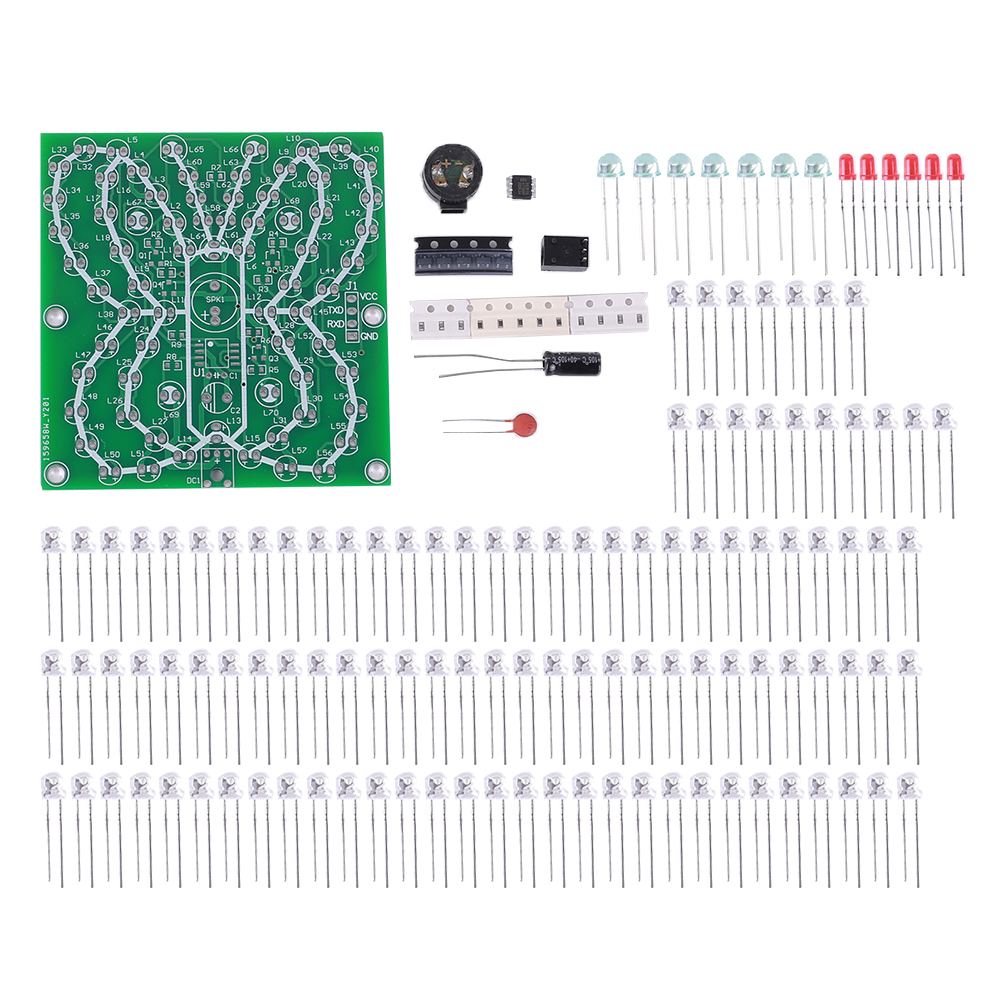
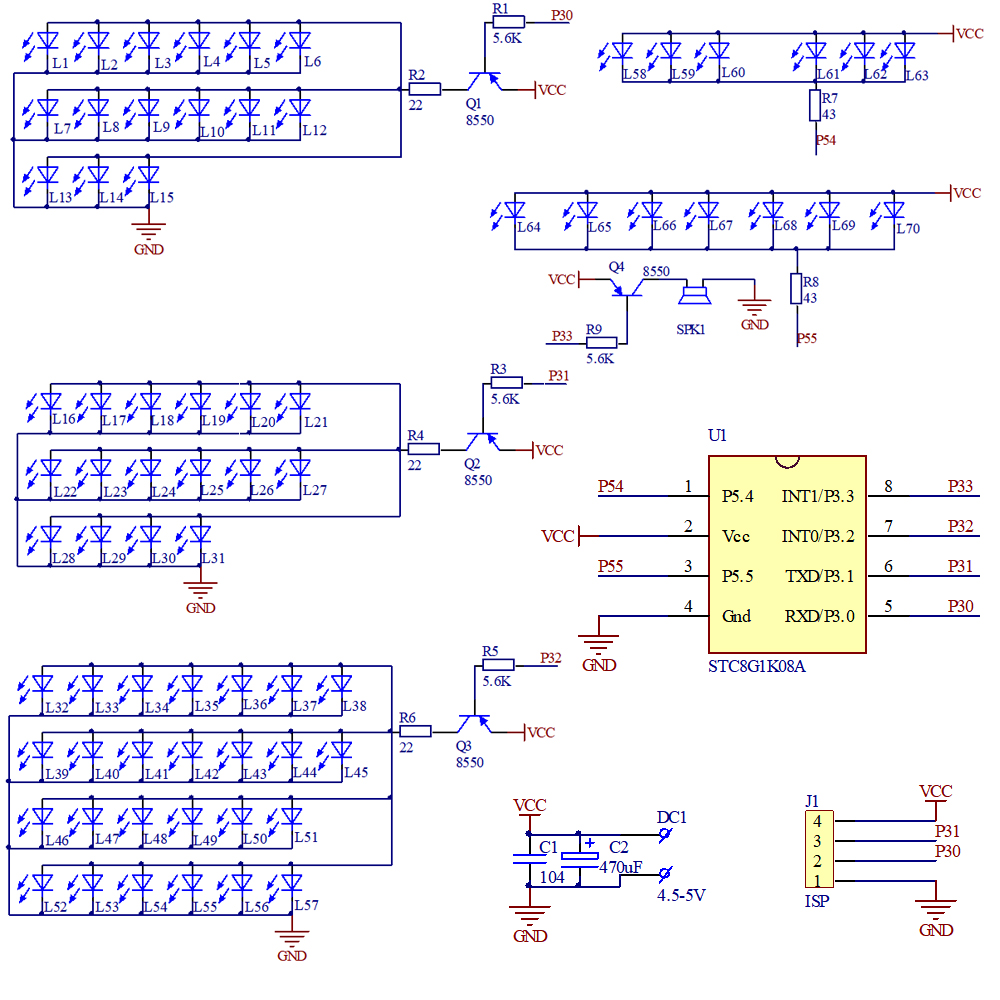
7. Components List and Schematic:
8.Installation Steps(Please be patient install):
Step 1: Install 1pcs SOP-8 STC8G1K08A at U1.There is a mark on one end of the IC and there is a mark on PCB where the IC can place on.These two marks are corresponding to each other and are used to specify the installation direction of the IC.
Step 2: Install 4pcs SOT-23 S8550 Transistor at Q1~Q4.
Step 3: Install 3pcs 22ohm 0805 SMD Resistor at R2,R4,R6.
Step 4: Install 2pcs 43ohm 0805 SMD Resistor at R7,R8.
Step 5: Install 4pcs 5.6Kohm 0805 SMD Resistor at R1,R3,R5,R9.
Step 6: Install 1pcs 0.1uF 104 Ceramic Capacitor at C1.
Step 7: Install 1pcs 220uF~470uF Electrolytic Capacitor at C1.
Step 8: Install 57pcs 5mm White LED at L1~L57.
Step 9: Install 7pcs 3mm Blue LED at L64~L70.
Step 10: Install 6pcs 3mm Red LED at L58~L63.
Note: Please pay attention to distinguish between positive and negative.The Longer pin is positive pole.
Step 11: Install 1pcs Buzzer at SPK1.Pay attention to the installation direction.
Step 12: Install 1pcs Power Socket at DC1.
Step 13: Connect to power supply and enjoy the effect.


