
- prev
- next
8M Recordable Sound Play Module MP3 WAV Music Voice Player With Volume Adjustment Lithium Battery Charging Circuit For DIY Music Gift Box Greeting Card
| Quantity | 5+ | 10+ | 30+ | 50+ |
| Price | $6.10 | $5.90 | $5.60 | $5.35 |
Product Details
Product Introduction:
- 1.Power Supply Voltage:4.5-5V or 3.7V lithium battery; Output 0.5-1W
- 2.Capacity:8M
- 3.Board Size: 30X30mm
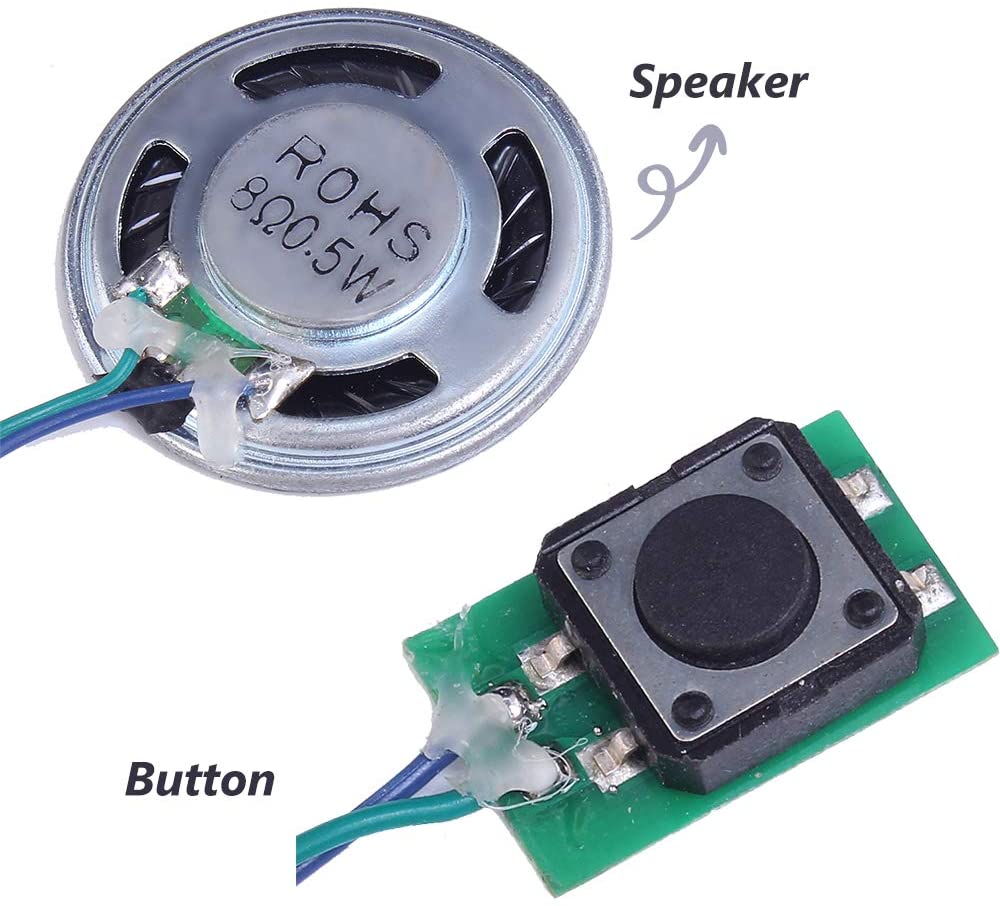
- 4.Speaker Diameter:m36mm
- 5.Memory Card Slot:Micro SDXC
- 6.Supported format: MP3, WAV
- 7.Connections: USB
- 8.Control mode:button / TTL
Description:
This product comes with almost all you need to add sound to a music box.
Simply need to add a power source from either 5V DC (such as a USB charger) or 3.7V Lithium Ion Battery.
A micro-USB connector is on the circuit board for adding or removing sound files.
The micro-USB connector is not for powering the device.
You must provide another source of power to the board in order to add or remove sound files.
The 8MB memory easily handled a couple of mp3 songs.
Replacing the supplied push button switch with a small micro switch was ideal to activate playback of the sound recordings.
The sound level was good enough for a music box.
Volume is adjustable using a small potentiometer on the circuit board.
Note: You have to use a USB2.0 port on the computer and not a USB3.0 port.
Feature:
PERFECT CREATIVE GIFT: It is ideal to make a DIY music box, musical greeting cards, photo frames, album, gift box and the other creative gifts for Mother’s Day, Valentine’s Day, Christmas.
8M MEMORY: Connect with your computer by a micro USB data cable. It is recognized by computer as a USB drive, just like a MP3 player, and you're free to add any MP3/WAV audio file to the internal 8M storage.
EASY TO PLAY WITH BUTTON: Install it in your project/gift, and then push the button. Your music which you put in it will be played once and automatically stop when the song finishes.
PROGRAMMABLE SOUND MODULE: Provide more possibilities to develop a module completely fit for your own project. You can select different trigger mode (button/TTL trigger) by connecting with different soldering pads.
It is ideal to make a DIY music box, musical greeting cards, memorabilia, photo frames, album, gift box and the other creative gifts. Install it in your project/gift, and then push the button. Your music which you put in it will be played once and automatically stop when the song finishes.

Connection Way


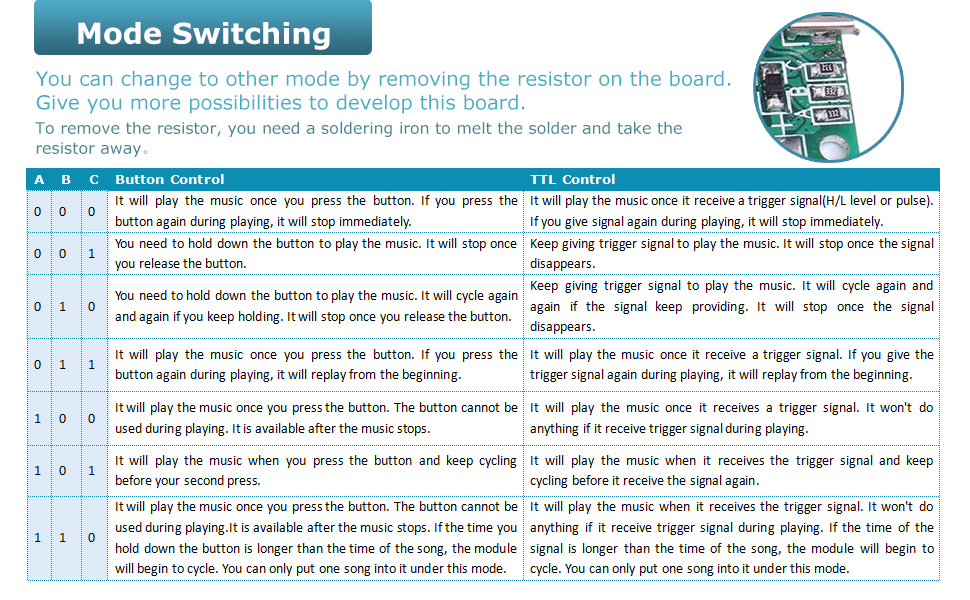
Control mode
In the table,‘0' means having 3.3K resistor; '1' means without 3.3K resistor.
You can see that there are 3 resistors on the board, so the default mode is 000 (It will play the music once you press the button.
If you press the button again during playing, it will stop immediately) . You can change to other mode by removing the resistor on the board.
For example, if you want to set 001 (Under this mode, you need to hold down the button to play the music.
It will stop once you release the button.), you need to remove the third resistor that marked C on the board. To remove the resistor, you need a soldering iron to melt the solder and take the resistor away. It is a little difficult if you are not good at soldering so we recommend you to use 000 default mode.
Power-ON-Play mode
It will enter Power-ON-Play mode if short circuit between two pads of button.
That is to say, it will play voice immediately when power on.
Instructions
① Connect 4.5V~5V non-rechargeable battery power;
② Press the button, and you will hear a test music which is a Chinese song. Press the button during playback, then it will stop playing immediately.
③ Connect the module to computer by USB cable; SUPPORT WINDOWS ONLY
④ It is recognized by computer as a USB drive, just like a MP3 player, and you're free to add any MP3/WAV audio file to the internal storage as long as it doesn't go over the 8MB limit;
⑤ Do not forget to delete the default audio file;
⑥ Repeat Step 2 to see if the module work well. Adjust the volume to a suitable degree.
Frequently Asked Question:
Question 1: Can I power the board with a USB battery stick? I used a power stick as power supply, the file will not play.
A: The micro-USB connector is on the circuit board for adding or removing sound files. The micro-USB connector is not for powering the device. Please wire a 3.7V Lithium Ion battery to the red/black wires. The red wire is positive and the black is negative.
Question 2: Why my Windows computer can't recognize the module?
A: Please note that a micro USB DATA Cable needs to be used to interface with this sound module. A micro USB charging cable is insufficient and will not work.
Question 3: I want to confirm that I can replace the speaker with a 1/8" audio jack and plug into a power speaker?
A: I am not sure if that it's feasible because the module and the audio jack output different audio signal. It may not work after transforming the audio signal, but you can have a try.
Question 4: Can I connect to a self-powered speaker?
A: Yes. But it should be 8ohm 0.5W speaker.
Question 5: I was able to put an mp3 file on it by using a microusb cable, but every attempt I've done feed the device with power hasn't produced any song.
A: The working voltage of the sound module is 4.5-5V. We recommend to use 3.7V lithium battery.
Question 6: What are the dimensions on this?
Answer:Hi friend, the controller board is about 2.36" X 1.57"
Question 7:does the audio file play on a loop? Or does it play one time, then you have to go back to dark, then expose it to light to play again?
Answer:Plays one time then you will need to expose it to light again.
Question 8:How can i add a song using a mac?
Answer:I plugged it into my macbook air and it showed up as a removable storage device. I was able to load a new MP3 on it just fine.
Please download the PDF user manual here:
.png)


