
- prev
- next
TAI-01 5V Infrared Audio Transceiver DIY Kit IR Sound Voice Transmitter Receiver Infrared Transmission Module
| Quantity | 50+ |
| Price | $2.85 |
Product Details
Description:
This is a DIY Infrared Reversing Indicator kit parts. You should solder it by yourself.Transmitting audio signals through infrared signals.
Features:
1>.High sensitivity;
2>.Low power;
3>.Wide operating voltage range;
4>.Low power consumption;
5>.DIY design;
Parameters:
| No. | Parameter | Value |
| 1 | Model | TAI-01 |
| 2 | Transmitter Operating Current | Less than 15mA |
| 3 | Soldering Difficulty Level | Easy |
| 4 | Working Voltage | DC 4V-9V(Recommend 5V) |
| 5 | Output Power | 2W(max) 8ohm |
| 6 | Communication Distance | 50cm |
| 7 | Transmitter PCB Size | 36.5*20mm |
| 8 | Receiver PCB Size | 39.5*23mm |
Working Principle:
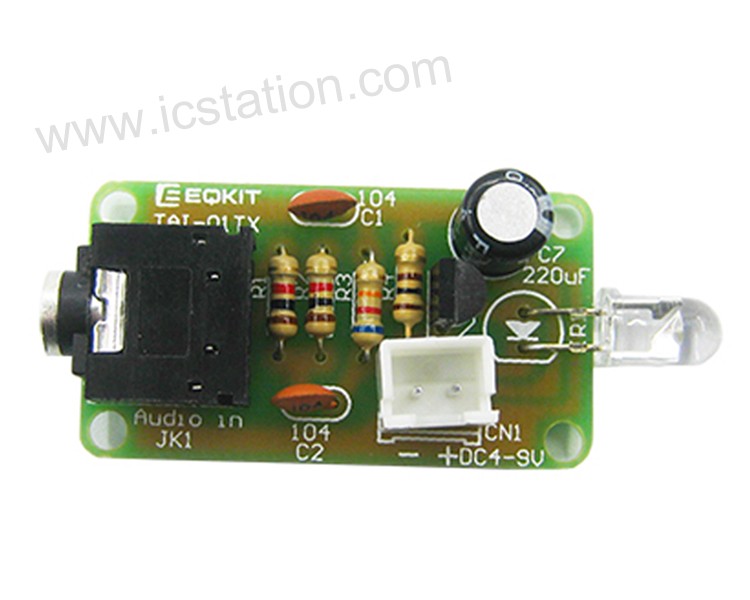
1>.Transmitter: The audio signal is loaded into the infrared light-emitting diode through triode modulation, so that the light emitted by the infrared light contains an audio signal.;
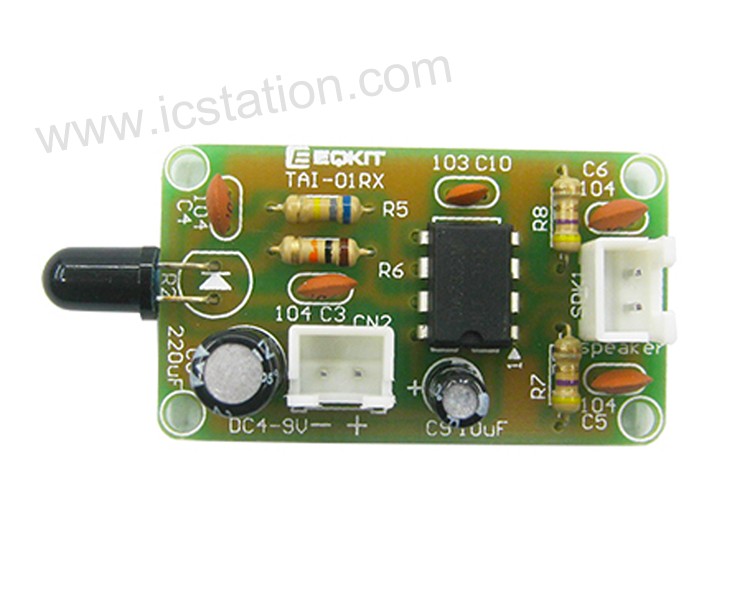
2>.Receiver: The infrared receiving diode converts the infrared light containing the audio signal into a weak electric signal, and the audio signal is amplified by the audio amplifier to push the horn to restore the sound.
Instructions:
Step 1: Complete the installation in the normal way following installation manual and schematic.(Please request separately).
Step 2:Connect 2W 8ohm speaker(It does not include in package!) and input audio;
Step 3:Connect DC 4-9V voltage.
Step 4:Test and use.
Using Attention:
1>. Please make sure all components in right direction and right place.
2>. Please check whether pseudo/float welding.This is very important .
3>. The soldering iron can't touch the components for a long time, otherwise the components will be damaged because of the high temperature.
4>. It is recommended to use a stable power supply, otherwise it may interfere with the audio signal output.
5>. It uses the infrared principle, so it can't be used in the sun or in high temperature environment, otherwise it will easily interfere with signal communication.
Component List:
| NO. | Component Name | PCB Marker | Parameter | Quantity |
| 1 | Metal Film Resistor | R7-R8 | 4.7K | 2 |
| 2 | Metal Film Resistor | R4 | 100ohm | 1 |
| 3 | Metal Film Resistor | R1-R2 | 1K | 2 |
| 4 | Metal Film Resistor | R6 | 10K | 1 |
| 5 | Metal Film Resistor | R3 | 62K | 1 |
| 6 | Metal Film Resistor | R5 | 680K | 1 |
| 7 | Ceramic Capacitor | C10 | 0.01uf 103 | 1 |
| 8 | Ceramic Capacitor | C1-C6 | 0.1uf 104 | 6 |
| 9 | Electrolytic Capacitor | C9 | 10uF | 1 |
| 10 | Electrolytic Capacitor | C7-C8 | 220uF | 2 |
| 11 | Infrared Emitter | IR1 | 5mm | 1 |
| 12 | Infrared Receiver | IR2 | 5mm | 1 |
| 13 | Triode | Q1 | S9014 | 1 |
| 14 | TDA2822 | U1 | DIP-8 | 1 |
| 15 | 2P Socket | CN1,CN2,SPK1 | 2.54mm | 3 |
| 16 | 2P Connector Cable | CN1,CN2,SPK1 | 15cm | 3 |
| 17 | Audio Socket | JK1 | 5P | 1 |
| 18 | Audio Cable | JK1 | 100cm | 1 |
| 19 | PCB | TA1-01TX | 36.5*20mm | 1 |
| 20 | PCB | TAI-01RX | 39.5*23mm | 1 |
Note: You can finish installation by PCB silk screen and component listing.
Application:
1>.Electronic teaching
2>.Exercise welding skills
3>.Circuit application
4>.Wireless audio communication
5>.Micro speaker
Frequency asked questions:
1>.Why can't work?
Q :Please make sure all components in right direction and right place and check whether pseudo/float welding.This is very important.
Install tools you need preliminary preparation by yourself:
1>. Soldering iron;
2>. Multimeter;
3>. Solder wire;
4>. Iron stand;
5>. Diagonal cutting pliers;
6>. The screwdriver;
7>. Tweezers;
8>. Long nose pliers;
9>. Suction tin;
10>. Cleaning sponge;
11>. Screwdriver set.
Download installation manual and schematic:
.png)
Finished Product Picture:
.jpg)
I. Tested by ICStation's Outstanding Partner The Unwanted Guy:
![]()
![]()
![]()
![]()
![]()
![]()
Learn More Details in the Video:
(The language in the video is English)
II. Tested by ICStation's Outstanding Partner bzoli5706:
![]()
![]()
![]()
You could hear some awesome music from the video:
![]()
If you put the tweezers between the modules, the music will stop.
![]()
Learn More Details in the Video:
(The language in the video is English)
Customer Reviews (1)
You Might Also Like
-
 PH Sensor DC 5V PH Test Monitoring Module
$11.19$15.99
PH Sensor DC 5V PH Test Monitoring Module
$11.19$15.99


