Your Shopping Cart Is Empty!
If you already have an account, Sign in.
If you already have an account, Sign in.


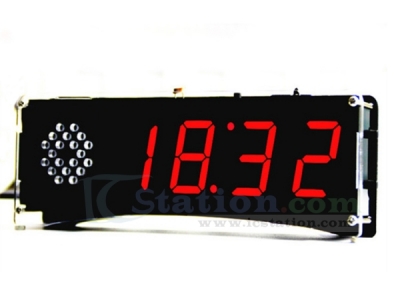
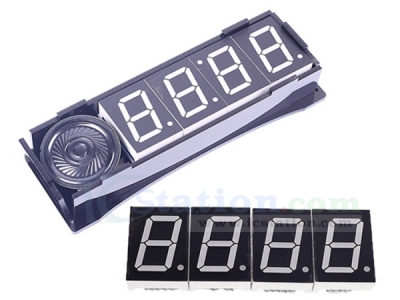
YD-030 Voice Digital Electronic Clock DIY Kit
1.Introduction:
YD-030 is a Voice Digital Electronic Clock DIY Kit. It will display current date and time and temperature in the real time. Alarm can be set as per your needs. Easy to operate, very suitable for home or office environment.
2.Feature:
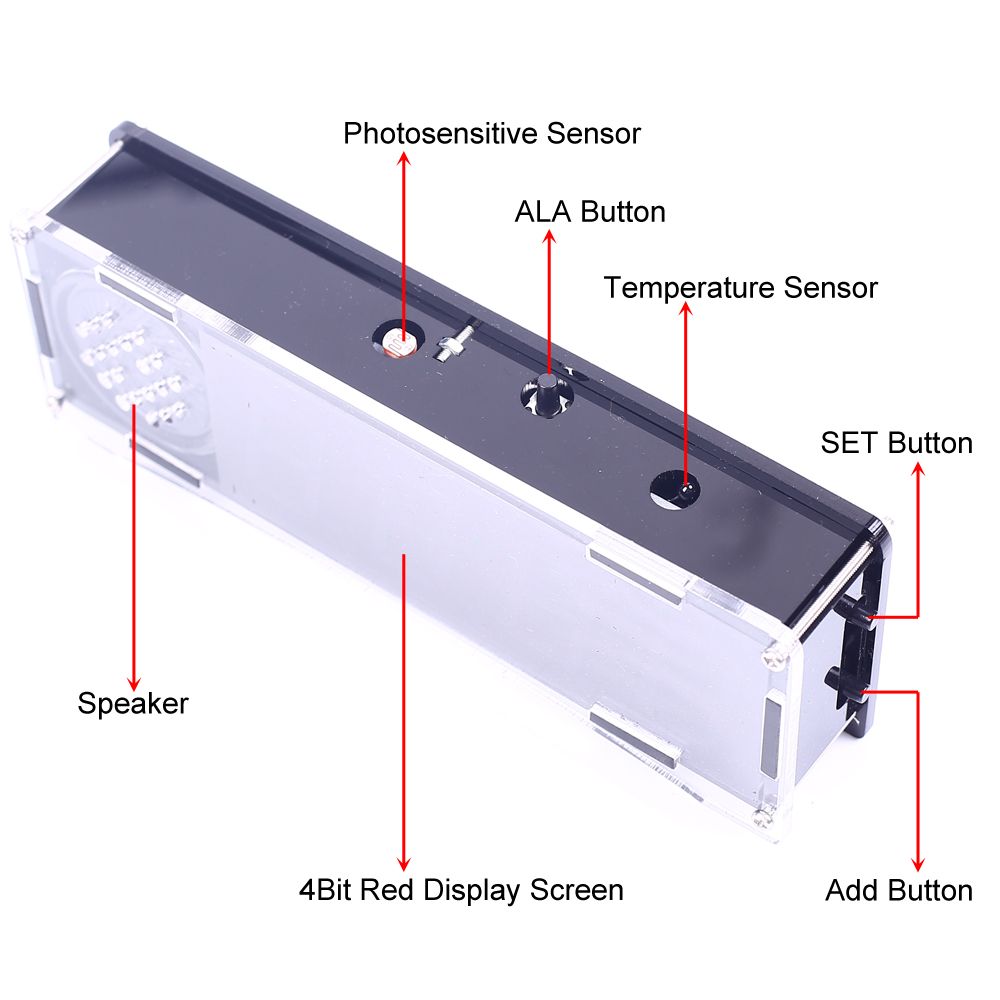
1>.Automatic brightness adjustment
2>.Time/Date/Alarm/Temperature
3>.12H or 24H hourly optional system
4>.Time memory function
5>.Temperature can be calibrated
6>.Voice Hourly Report
7>.DIY manual soldering
8>.Simple and easy to operate
3.Parameter:
1>.Item name: YD-030 Voice Digital Electronic Clock DIY Kit
2>.Model:YD-030
3>.Work voltage:DC 5V
4>.Work Temperature:-40℃~85℃
5>.Work Humidity:0%~95%RH
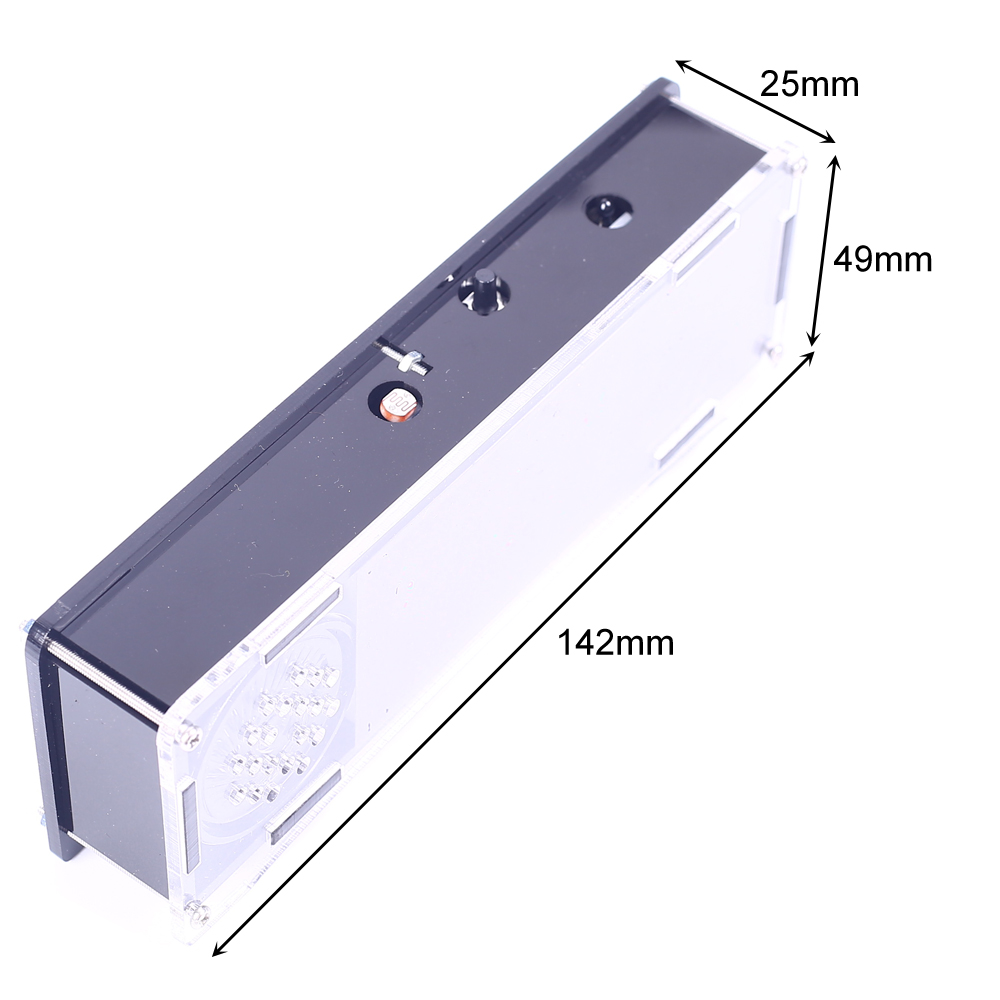
6>.Size(Installed):142*49*25mm
4.Function Set:
1>.Calibration temperature: Short press ’ SET ’ button for the 1st time and then press ’ Add’ button to calibrate the temperature value.(Note: The parameter value will flash automatically and the same as following functions)
2>.Set Year: Short press ’ SET ’ button for the 2nd time and then press ’ Add’ button to set value for current year.
3>.Set Month: Short press ’ SET ’ button for the 3rd time and then press ’ Add’ button to set value for current month.
4>.Set Day: Short press ’ SET ’ button for the 4th time and then press ’ Add’ button to set value for current day.
5>.Set Week: Short press ’ SET ’ button for the 5th time and then press ’ Add’ button to set value for current week.
6>.Set 12/24H mode: Short press ’ SET ’ button for the 6th time and then press ’ Add’ button to select 12H or 24H.
7>.Set Hour: Short press ’ SET ’ button for the 7th time and then press ’ Add’ button to set value for current hour.
8>.Set Minute: Short press ’ SET ’ button for the 8th time and then press ’ Add’ button to set value for current minute.
9>.ON/OFF Alarm: Short press ’ SET ’ button for the 9th time and then press ’ Add’ button to turn ON or OFF alarm. It will display ‘A ON’ or ‘AOFF’.
10>.Set Alarm Hour: Short press ’ SET ’ button for the 10th time and then press ’ Add’ button to set value for alarm hour.
11>.Set Alarm Minute: Short press ’ SET ’ button for the 11th time and then press ’ Add’ button to set value for alarm minute.
12>.Set Alarm Rings: Short press ’ SET ’ button for the 12th time and then press ’ Add’ button to set rings for alarm.It will display ‘V 00’ or ‘V 01’.
13>.ON/OFF Hourly Report: Short press ’ SET ’ button for the 13th time and then press ’ Add’ button to turn ON or OFF Hourly Report. It will display ‘C ON’ or ‘COFF’.
14>.Set Hourly Report Start Hour: Short press ‘SET’ button for the 14th time and then press ’Add’ button to set value for Hourly Report Start hour.
15>.Set Hourly Report Stop Hour: Short press ‘SET’ button for the 15th time and then press ’Add’ button to set value for Hourly Report Stop Hour. Such as 7-21 means Hourly Report from 7:00 to 21:00
16>.Save and Exit: Short press ’ SET ’ button for the 16th time to save parameters and return to normal display status.
5.Auxiliary Function:
1>.Reset: Keep press ‘SET’ and ‘Add’ buttons at the same time for 10~15 second,and then release. It will return to factory settings by display time 7:59. And after 10second,the alarm will turn ON at 8:00.
2>.Stop alarm: Press ‘ALA’ button to stop alarm when it is working.
3>.Latch parameters:Keep press ‘Add’ button about 1~3 second to lock or unlock parameter set function. It can not enter set mode if lock parameter and it is used to prevent misoperation.
4>.Set display mode:Keep press ‘Add’ button about 3~5 second to switch display mode:Only display time or Display time, day, week, temperature in turns.
5>.Speech time clock: Press ‘ALA’ button to broadcast time, date,temperature.
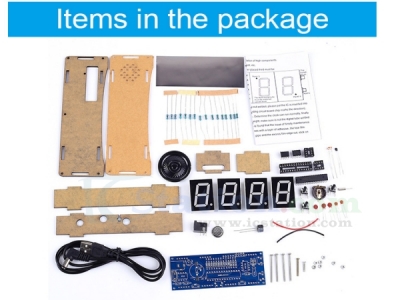
6.Installation Steps(Please be patient):
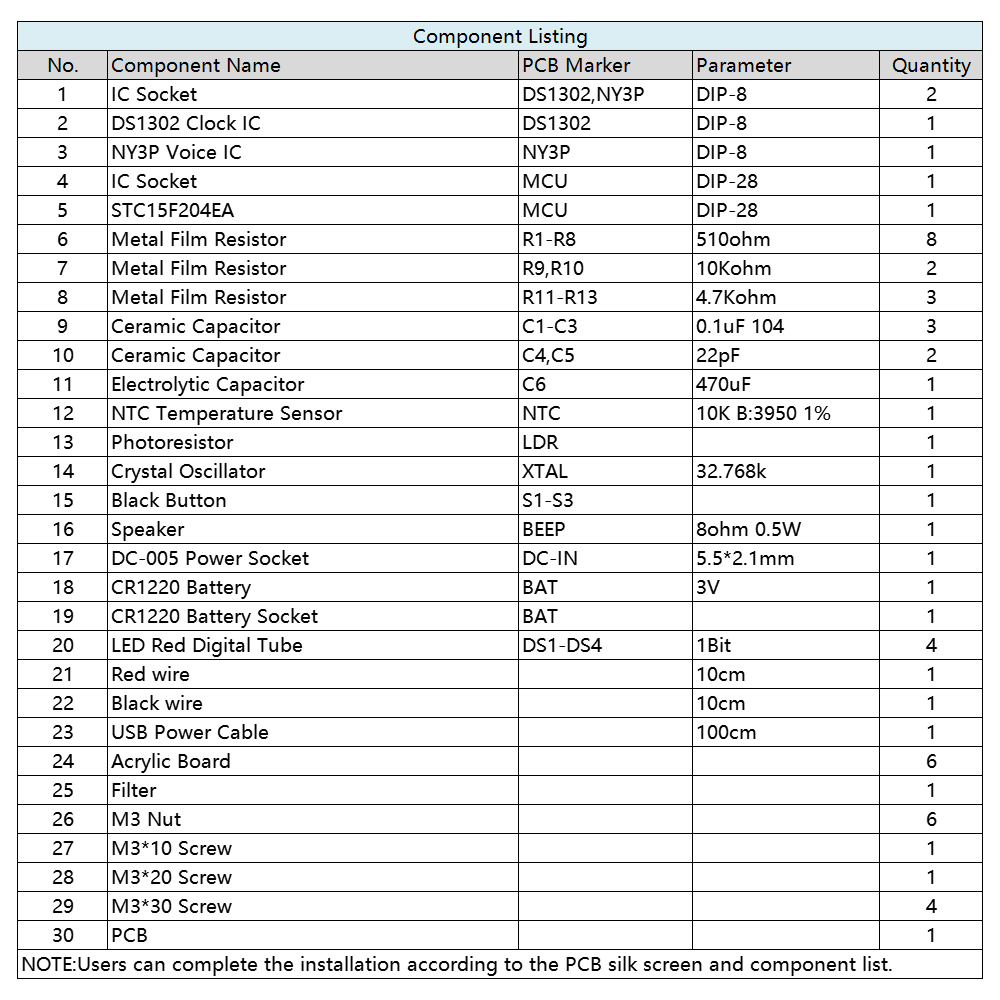
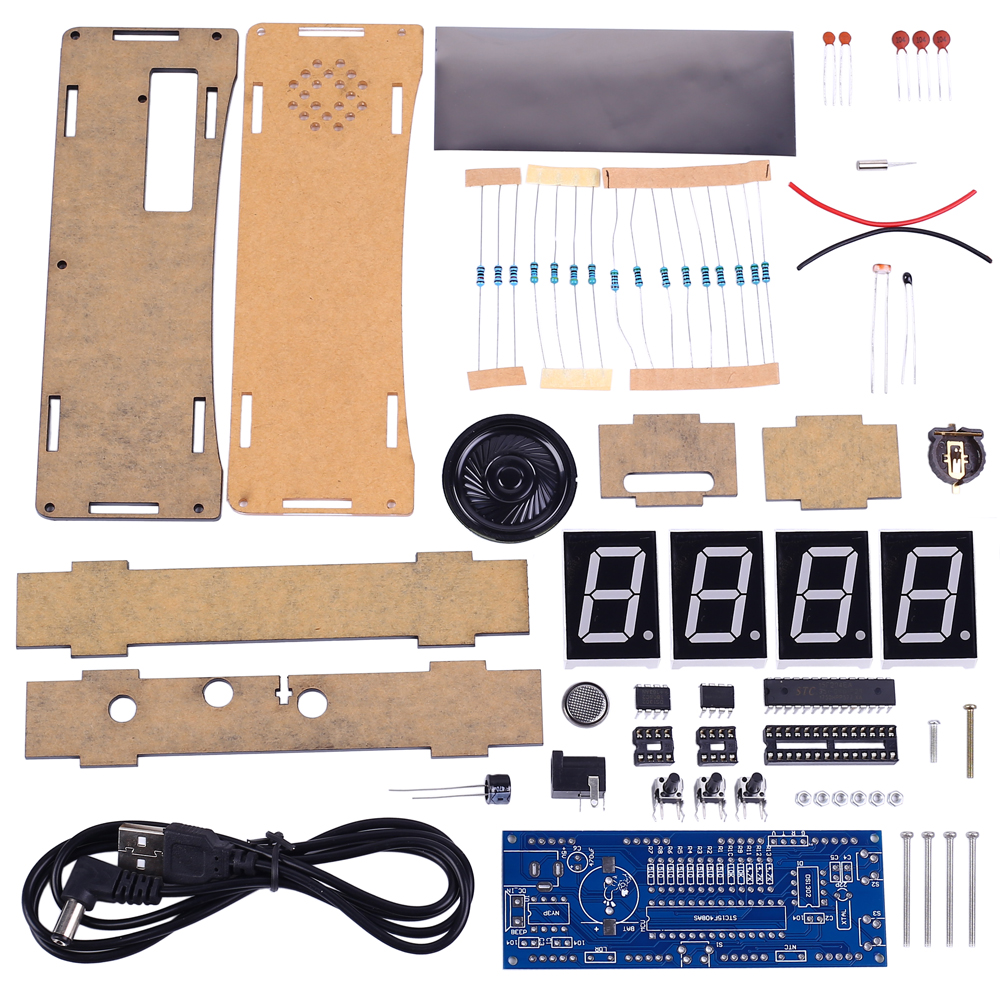
Step 1: Install 8pcs 510ohm Metal Film Resistor at R1-R8. Identify the resistor value as shown in color: Green/Brown/Black/Black/Brown.
Step 2: Install 2pcs 10Kohm Metal Film Resistor at R9,R10. Identify the resistor value as shown in color: Brown/Black/Black/Red/Brown.
Step 3: Install 2pcs 4.7Kohm Metal Film Resistor at R11-R13. Identify the resistor value as shown in color: Yellow/Purple/Black/Brown/Brown.
Step 4: Install 1pcs 32.768K Crystal Oscillator at XTAL.
Step 5: Install 1pcs 10K B:3950 1% NTC Temperature Sensor at NTC. Pay attention to reserve 3mm distance.
Step 6: Install 1pcs Photoresistor at LDR. Pay attention to reserve 3mm distance.
Step 7: Install 1pcs DIP-28 IC Socket at MCU.There is a mark(notch) on one end of the IC Socket and there is a mark(curved silk screen printing) on PCB where the IC Socket can place on.These two marks are corresponding to each other and are used to specify the installation direction of the IC Socket.
Step 8: Install 2pcs DIP-8 IC Socket at DS1302,NY3P by the same method.
Step 9: Install 1pcs CR1220 Battery Socket at BAT.Pay attention to the installation direction.
Step 10: Install 2pcs 22pF Ceramic Capacitor at C4,C5.
Step 11: Install 3pcs 0.1uF 104 Ceramic Capacitor at C1-C3.
Step 12: Install 1pcs 470uF Electrolytic Capacitor at C6. There is a white ‘ + ’ on PCB silk screen printing where the positive(anode) can insert into.The longer lead is positive(anode)
Step 13: Install 3pcs Black Button at S1-S3.
Step 14: Install 1pcs 5.5*2.1mm DC-005 Power Socket at DC-IN.
Step 15: Install 1pcs DIP-28 IC STC15F204EA at MCU.There is a mark(notch) on one end of the IC Socket and there is a mark(curved silk screen printing) on PCB where the IC can place on.These two marks are corresponding to each other and are used to specify the installation direction of the IC.
Step 16: Install 1pcs DIP-8 IC DS1302 Clock Chip by the same method.
Step 17: Install 1pcs DIP-8 IC NY3P Voice Chip by the same method.
Step 18: Install 1pcs 3V CR1220 Battery on battery socket. Note the front of the battery.
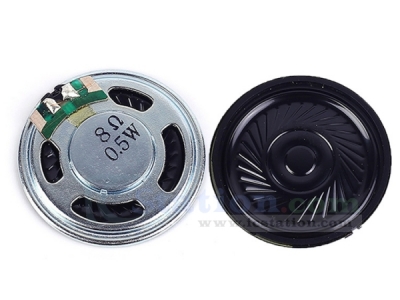
Step 19: Connect 1pcs 8ohm 0.5W Speaker to BEEP by 15cm red and black wire.
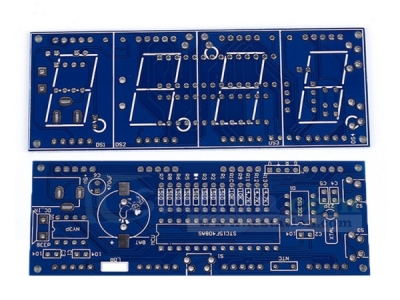
Step 20: Install 4pcs 1Bit LED Red Digital Tube at DS1-DS4.Pay attention to the installation direction of the decimal point. The installation direction of the third one is different.
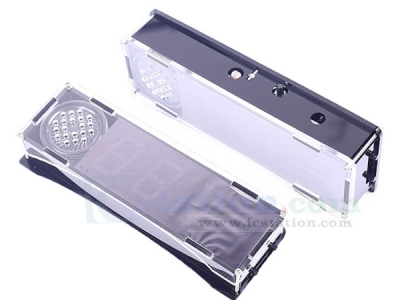
Step 21: Tear off the protective film on the surface of acrylic board.
Step 22: Fix acrylic board by M3*10 Screw and nut.
Step 23: Place PCB module on acrylic case and install M3*20 Screw which is used to fix speaker.
Step 24: Place the speaker in the correct position.
Step 25: Place Filter and Acrylic Board as screen and fix by 4pcs M3*30 Screws and nuts.
Step 26: Connect to power supply and set parameters according to set method.
| Quantity | 3+ | 5+ | 10+ |
| Price | $11.00 | $10.80 | $10.50 |
ICStation doesn't accept any form of pay on delivery. Items used to be shipped after payment. Below are the payment methods we can accept at the moment:
1) Paypal Payment
PayPal is a secure and trusted payment processing service that allows you to shop online. PayPal can be used at icstation.com to purchase items by Credit Card (Visa, MasterCard, Discover, and American Express), Debit Card , or E-check (i.e. using your regular Bank Account).

We are PayPal Verified 
2) Bank Transfer / Wire Transfer / T/T
Bank Transfer / Wire Transfer / T/T payment methods are accepted for orders which the total price is up to US$300. The bank will charge about US$50 for the transfer fee if we do the payment in these ways. Feel free to contact us for bank payment details if you need pay via bank.
For other payment method, please contact us at orders@icstation-team.com for more details.