Your Shopping Cart Is Empty!
If you already have an account, Sign in.
If you already have an account, Sign in.


1.Introduction:
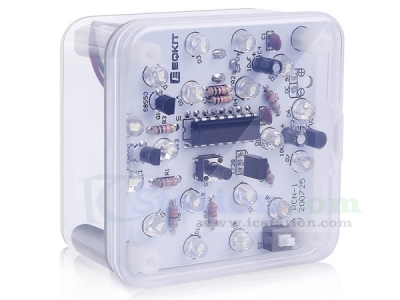
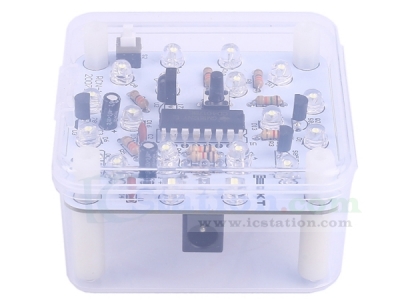
RCN-1 is a DC 9V-12V Infrared Remote Control DIY Kit.
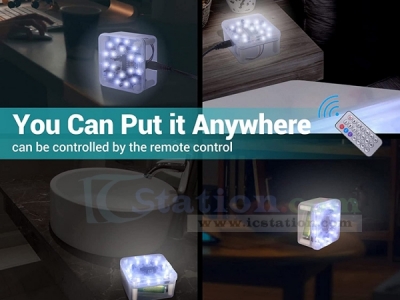
User can use any infrared remote controller to control the lamp on or off with 18pcs white LED.
( Please note: The infrared remote controller is not included)
2.Feature:
【LED Light Controller Kit】: The electronic soldering DIY kit is used to installed to a white cute LED lamp which can be remotely controlled. You can use the remote control (Not Included) or the button on the project to control the light on or off. This soldering learning electric kit can be widely used in schools to help students to learn basic mechanical and electronic skills. It's a great solder practice kit. Highly recommended to practice soldering skills enjoyably for you and your family.
【Easy to Assemble】: In addition to teaching basic mechanical and electronic principles, the led light controller kit is easy to build and the principle is simple. The connection that was clearly mapped and labeled on the board.No programming is required. The soldering project kit is suitable for DIY electronics enthusiasts and can be used as school education practice kits.
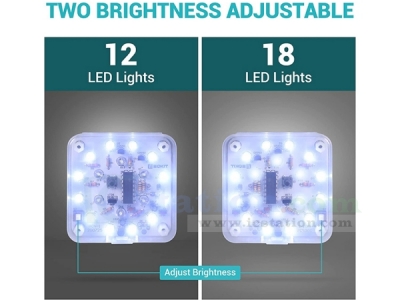
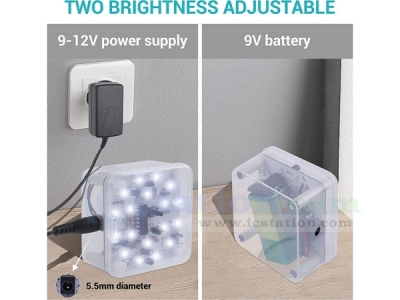
【Functions & Features】: This diy small LED night light bright enough at night. Two levels of brightness can be adjusted, S2 switch is used for brightness adjustment, control 12 LED lights to turn on or 18 LED lights to turn on. The LED light can be powered by 9-12V battery or power adapter (5.5mm diameter). If you want to use a power adapter to supply power, you need to use a screwdriver or an electric soldering iron to drill a hole in the corresponding position of the shell.
【Great School Science Project】: DIY electric kit for soldering practice and also suitable for family education. Not only to improve your soldering skills, you will also will be more familiar with electronic components and learn more interesting electronics things. But please note, this DIY LED light kit requires certain foundation of basic electronic theoretical knowledge and welding and hands-on ability.
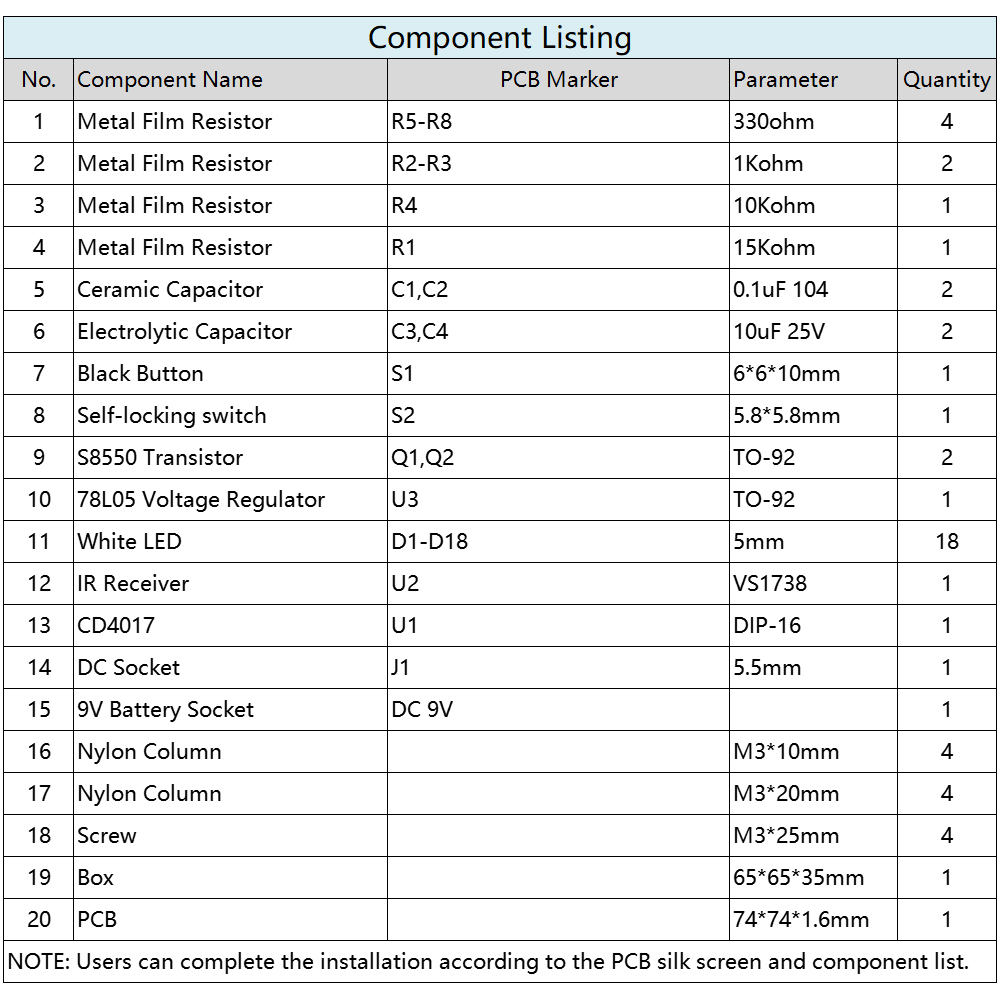
3.Parameter:
1>.Product Name:RCN-1 IR Control Lamp DIY Kit
2>.Product Number:RCN-1
3>.Work Voltage:DC 9V-12V
4>.Work Current:30mA
5>.Power Type:5.5mm Power Socket or 9V Battery (Not Included)
6>.Work Mode:Switch or Infrared Remote Control
7>.Color:White LED
8>.Work Temperature:-40℃~85℃
9>.Work Humidity:5%~85%RH
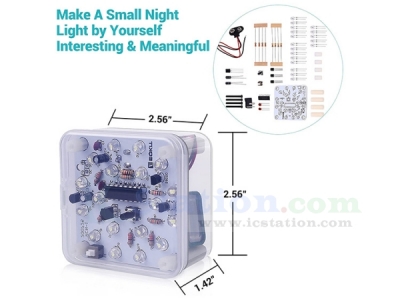
10>.Size(Installed):65*65*36mm
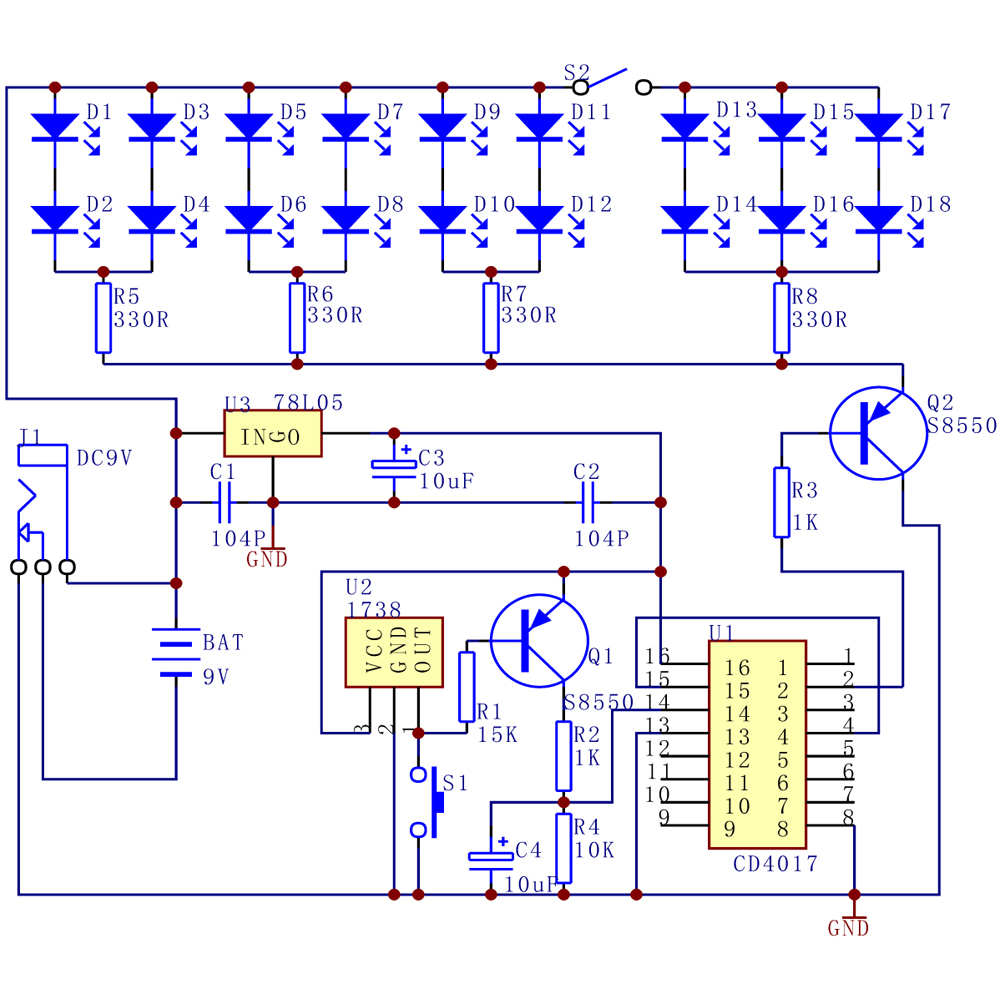
4.Function:
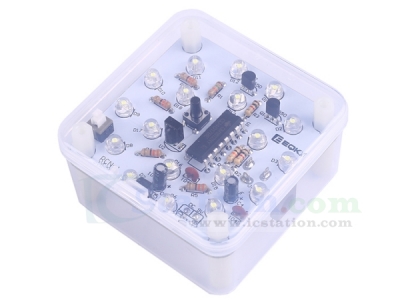
1>.S1 black button is used to turn ON or OFF lamp.
2>.S2 self-locking switch is used to change led brightness. 12pcs LED turn ON or 18pcs LED turn ON.
3>.Any infrared remote controller to control the lamp on or off.
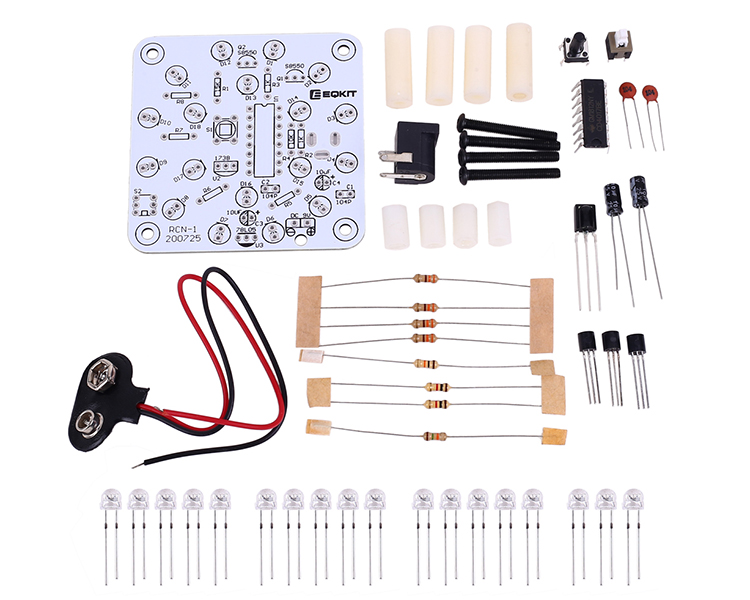
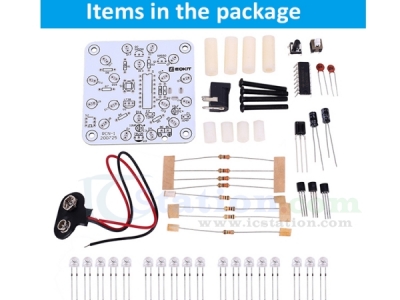
5.Installation Steps(Please be patient ):
.png)
Step 1: Install 4pcs 330ohm Metal Film Resistor at R5-R8.
Step 2: Install 2pcs 1Kohm Metal Film Resistor at R2,R3.
Step 3: Install 1pcs 10Kohm Metal Film Resistor at R4.
Step 4: Install 1pcs 15Kohm Metal Film Resistor at R1.
Step 5: Install 18pcs LED at D1-D18.The longer pin is inserted into the rectangular pad(positive pole). The shorter pins are inserted into the round pads.
Step 6: Install 2pcs 0.1uF 104 Ceramic Capacitor at C1,C2.
Step 7: Install 1pcs TO-92 78L05 Voltage Regulator at U3.
Step 8: Install 2pcs TO-92 S8050 Transistor at Q1,Q2.
Step 9: Install 1pcs DIP-16 CD4017 IC at U1.There is a mark on one end of the IC and there is a mark on PCB where the IC can place on.These two marks are corresponding to each other and are used to specify the installation direction of the IC.
Step 10: Install 2pcs 10uF 25V Electrolytic Capacitor at C3,C4.Pay attention to distinguish between positive and negative.The Longer pin is positive pole.The longer pin is inserted into the rectangular pad.
Step 11: Install 1pcs 6*6*10mm Black Button at S1.
Step 12: Install 1pcs TO-92 78L05 Voltage Regulator at U2.
Step 13: Install 1pcs 5.8*5.8mm Self-locking switch at S2.
Step 14: Install 1pcs 5.5mm DC Socket at J1 on another side.
Step 15: Install 4pcs M3*10mm and 4pcs M3*20mm Nylon Column on PCB.
Step 16: Install 1pcs 9V Battery socket at DC 9V. Note: Red wire connect to ‘ + ’ .
Step 17: Install 9V battery(not included) and then place lamp on plastic shell.Then press button to switch lamp.
| Quantity | 5+ | 10+ | 30+ |
| Price | $5.25 | $5.15 | $4.80 |
ICStation doesn't accept any form of pay on delivery. Items used to be shipped after payment. Below are the payment methods we can accept at the moment:
1) Paypal Payment
PayPal is a secure and trusted payment processing service that allows you to shop online. PayPal can be used at icstation.com to purchase items by Credit Card (Visa, MasterCard, Discover, and American Express), Debit Card , or E-check (i.e. using your regular Bank Account).

We are PayPal Verified 
2) Bank Transfer / Wire Transfer / T/T
Bank Transfer / Wire Transfer / T/T payment methods are accepted for orders which the total price is up to US$300. The bank will charge about US$50 for the transfer fee if we do the payment in these ways. Feel free to contact us for bank payment details if you need pay via bank.
For other payment method, please contact us at orders@icstation-team.com for more details.