Home > DIY Module > Funny DIY > DIY Kit Green Yellow Dual-Color Flashing Light Analog Traffic Signal Indicator Electronic Soldering Practice Tranining Kit

DIY Kit Green Yellow Dual-Color Flashing Light Analog Traffic Signal Indicator Electronic Soldering Practice Tranining Kit

GY18599-2
5 9
$6.59 $4.61
Contact us for wholesale price
Time Remaining:
- OR - - OR - Add to Wish List
1.Introduction:
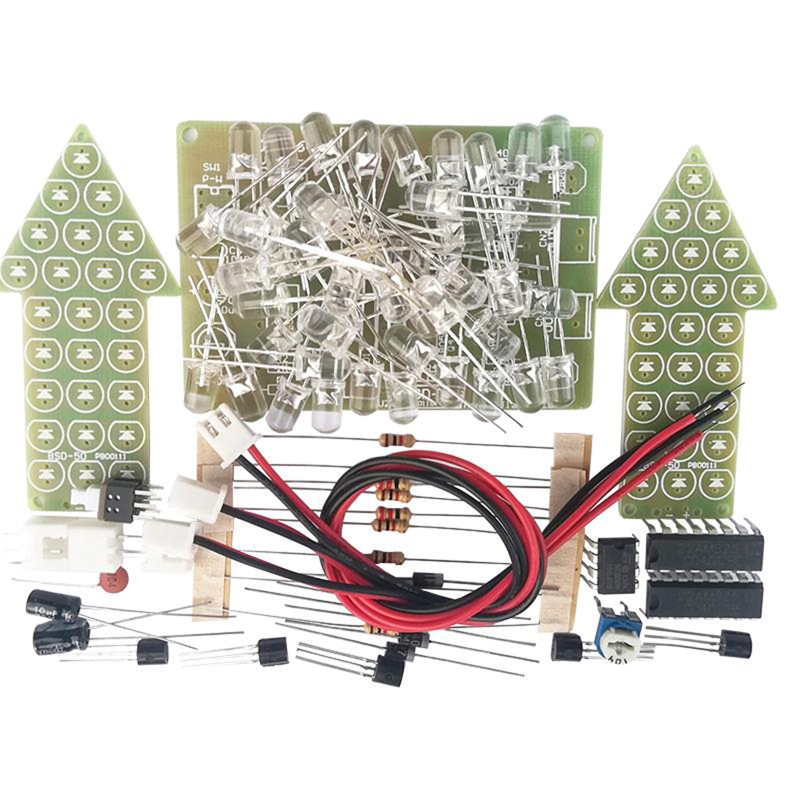
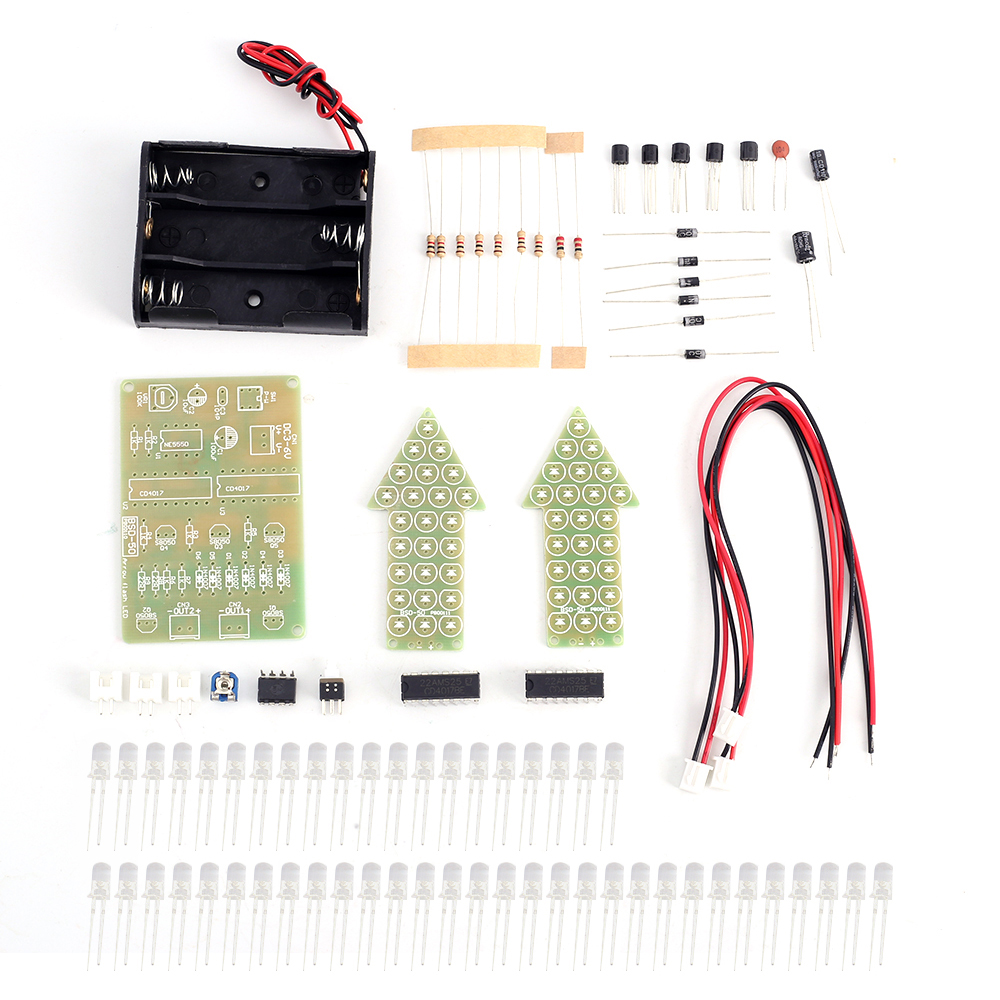
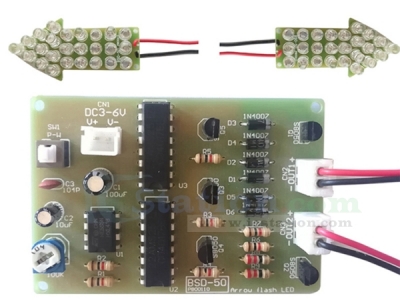
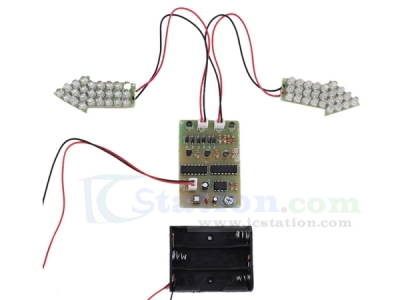
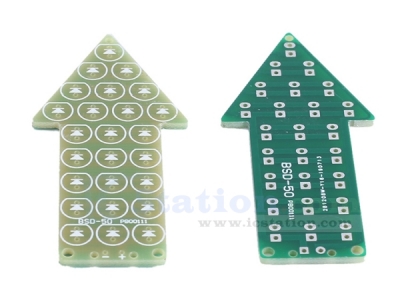
    BSD-50 Dual-Color Flashing Light DIY Kit is a flash kit consists of circuit board and allows 50pcs LED flash alternately. It can simulate the traffic signal indicator which is very helpful for beginners to understand the circuit principle.
 
2.Feature:
    1>.50pcs highlight LED
    2>.Perfect simple circuit
    3>.Automatic flashing
    4>.Comes with battery box
 
3.Parameter:
    1>.Product Name:BSD-50 Dual-Color Flashing Light DIY Kit
    2>.Product Number:BSD-50
    3>.Work Voltage:DC 3V~6V
    4>.Work Current:50mA
    5>.Power Type:Battery Box
    6>.Work Module:Switch Control
    7>.Color:Green+Yellow LED
    8>.Flashing Speed:Adjustable
    9>.Flashing Mode:Left 4times => Right 4times => All 4times
    10>.Work Temperature:-40℃~85℃
    11>.Work Humidity:0%~95%RH
    12>.Main PCB Size(Installed):66*45*13mm
    13>.LED PCB Size(Installed):61*29*11mm
 
4.Application:
    1>.Training welding skills
    2>.Student school
    3>.DIY production
    4>.Project Design
    5>.Electronic competition
 
5.Installation Tips:
    1>.User needs to prepare the welding tool at first.
    2>.Please be patient until the installation is complete.
    3>.The package is DIY kit.It need finish install by user.
    4>.The soldering iron can't touch the components for a long time(1.0 second), otherwise it will damage the components.
    5>.Pay attention to the positive and negative of the components.
    6>.Strictly prohibit short circuit.
    7>.User must install the LED according to the specified rules.Otherwise some LED will not light.
    8>.Install complex components preferentially.
    9>.Make sure all components are in right direction and right place.
    10>.Check that all of the LED can be illuminated.
    11>.It is strongly recommended to read the installation manual before starting installation!!!
    12>.Please wear anti-static gloves or anti-static wristbands when installing electronic components.
 
6.Installation Steps(Please be patient):
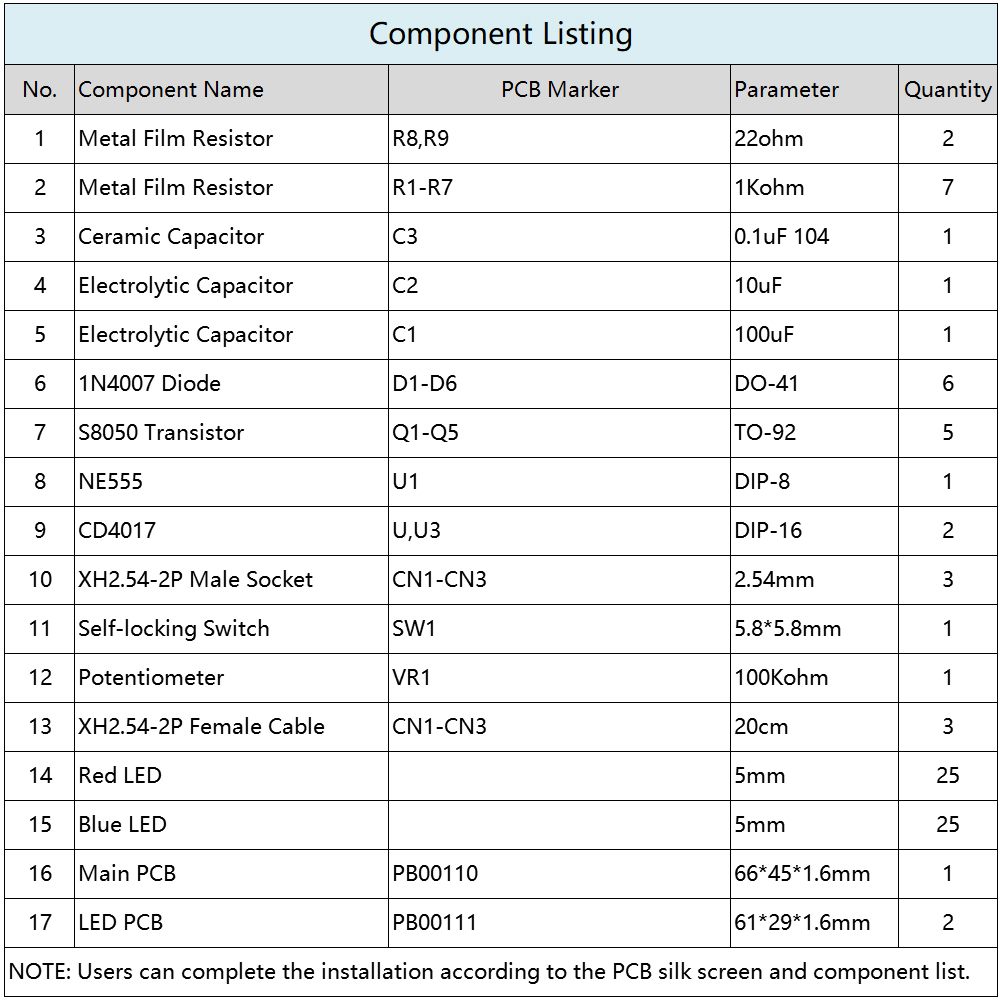
    Step 1: Install 2pcs 22ohm Metal Film Resistor at R8,R9.
    Step 2: Install 7pcs 1Kohm Metal Film Resistor at R1-R7.
    Step 3: Install 6pcs DO-41 1N4007 Diode at D1-D6.The white mark is negative pole.
    Step 4: Install 1pcs 0.1uF 104 Ceramic Capacitor at C3.
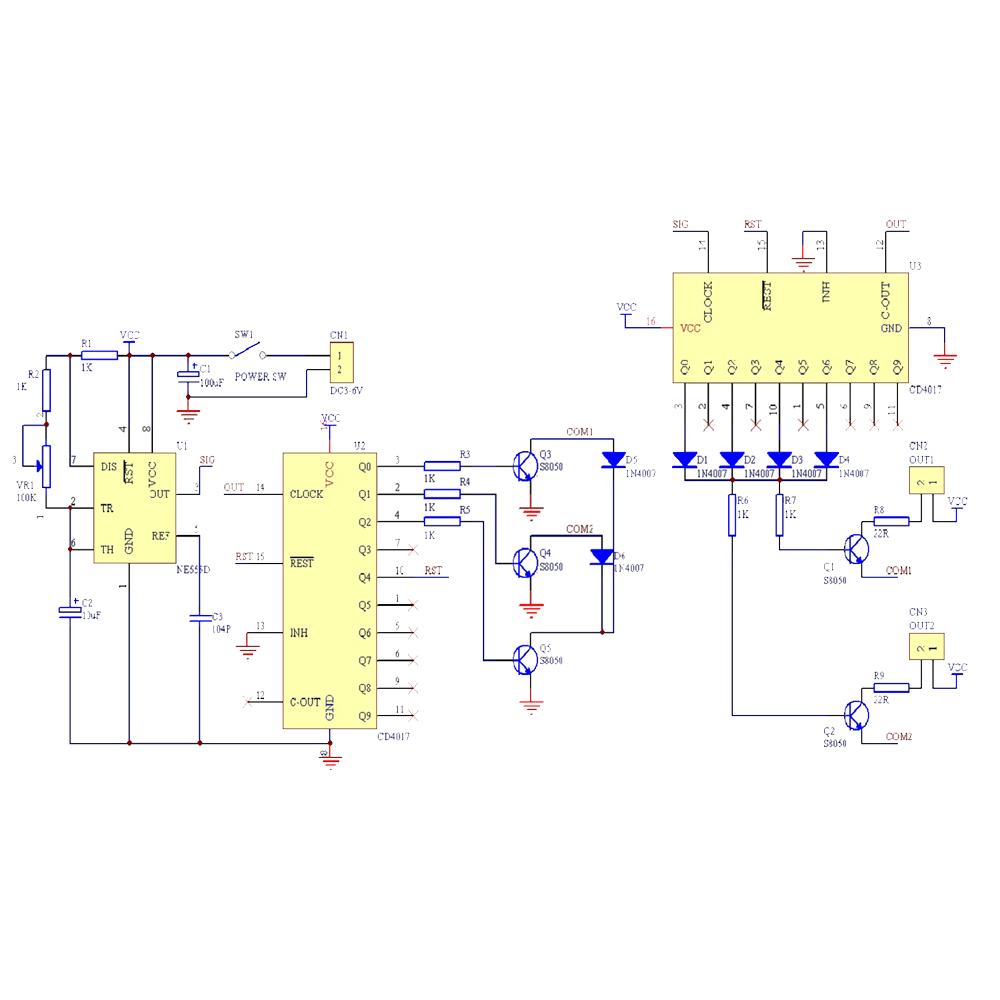
    Step 5: Install 2pcs DIP-16 CD4017 at U2,U3.There is a dot on one end of the IC and there is a mark on PCB where the IC can place on.These two marks are corresponding to each other and are used to specify the installation direction of the IC.
   Step 6: Install 3pcs XH2.54-2P Male Socket at CN1-CN3.
   Step 7: Install 1pcs DIP-8 NE555 at U1.There is a dot on one end of the IC and there is a mark on PCB where the IC can place on.These two marks are corresponding to each other and are used to specify the installation direction of the IC.
   Step 8: Install 5pcs TO-92 S8050 Transistor at Q1-Q5.
   Step 9: Install 1pcs 100uF Electrolytic Capacitor at C1.Pay attention to distinguish between positive and negative.The Longer pin is positive pole.The longer pin is inserted into the rectangular pad. 
   Step 10: Install 1pcs 10uF Electrolytic Capacitor at C2.Pay attention to distinguish between positive and negative.The Longer pin is positive pole.The longer pin is inserted into the rectangular pad. 
   Step 11: Install 1pcs 5.8*5.8mm Self-locking Switch at SW1.There is a concave on switch and there is a white mark on PCB where the switch can place on.These two marks are corresponding to each other and are used to specify the installation direction of the switch.
   Step 12: Install 1pcs 100Kohm Potentiometer at VR1.
   Step 13: The longer pin is inserted into the rectangular pad(positive pole). The shorter pins are inserted into the oval pads.
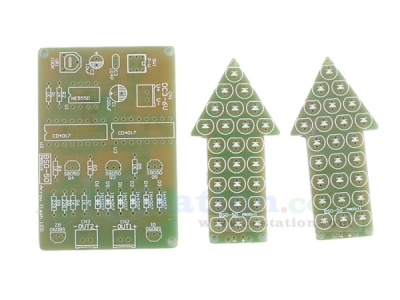
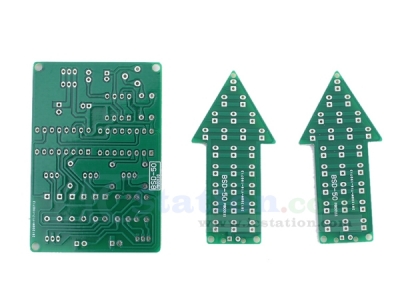
   Step 14: Install 25pcs Green LED on one light PCB and 25pcs Yellow LED on another light PCB .
   Step 15: Install wire to 3pcs PCB.Red wire connects to positive pole and Black wire connects to negative pole.
   Step 16: Connect to power supply and enjoy the effect.


There are currently no product reviews.

First we should say that ICStation doesn't accept any form of pay on delivery.Items used to be shipped after receiving the order info and payment.

1) Paypal Payment

PayPal is a secure and trusted payment processing service that allows you to shop online. PayPal can be used at icstation.com to purchase items by Credit Card (Visa, MasterCard, Discover, and American Express), Debit Card , or E-check (i.e. using your regular Bank Account). 


We are PayPal Verified 


2) West Union


We know that some of you do not have the Paypal account. 

But please take it easy. You can use West Union payment method.
Learn more at West Union at www.westernunion.com.
 
For the receiver info, please contact us at orders@icstation-team.com.
 
3) Bank Transfer / Wire Transfer / T/T
 

Bank Transfer / Wire Transfer / T/T payment methods are accepted for orders which the total price is up to US$500. The bank will charge about US$60 for the transfer fee if we do the payment in these ways. 

For other payment method, please contact us at orders@icstation-team.com for more details.

1. Yanwen / YunExpress / 4PX / China Post Airmail Service

(1) Due to the high risk of package lost recently, we have to stop using the free shipping way these days. Hope for your kind understanding! And the $5 is for tracking number and delivery insurance ^0^ Enjoy order from us. 

Free Shipping for all orders over $20 ^0^ (with free tracking number and delivery insurance fee)

(2) Shipping time 
Shipping time is 7-20 business days to most of countries; please view below table for exactly shipping time to your location. 

7-15 working days to: Most of Asia countries
10-16 working days to: USA , Canada , Australia , UK , Most of Europe countries
13-20 working days to: Germany , Russia
18-25 working days to: France , Italy , Spain , South Africa
20-45 working days to: Brazil , Most of South America countries

2. DHL/FedEx Express

(1)Shipping Fee: Free for the order which meet the following requirements
Total price of the order >= 200USD or Total weight of the order >= 2.2KG

When the order meets to one of the above requirement, it will be shipped for FREE via EMS/DHL/UPS Express to below country. 
Asia: Japan , South Korea , Mongolia . Malaysia , Singapore , Thailand , Vietnam , Cambodia , Indonesia , Philippines 
Oceania: Australia , New Zealand , Papua New Guinea 
Europe& America: Belgium, Britain, Denmark, Finland, Greece, Ireland, Italy, Luxembourg, Malta, Norway, Portugal, Switzerland, Germany, Sweden, France, Spain, USA, Austria, Canada
Note: Shipping Fee to other countries, please contact orders@icstation-team.com

(2) Shipping Time & Delivery Time

Shipping time: 1-3 days
Delivery time: 5-10 working days (about 1-2 weeks) to most of countries. 

Because the package would be returned to the sender if it had not been signed by the receiver , please pay attention to the arriving time of the package. 

Note:

1) APO and PO Box Addresses

We strongly recommend that you provide a physical address for order delivery. 
Because that DHL and FedEx are unable to deliver items to APO or PO BOX addresses. 
 
2) Contact Phone Number
Receivers' contact phone number is required by express shipping agency for the package delivery. Please provide us with your latest phone number.


3. Note
1) Delivery Time of mixed orders with items in different Shipping Status should be calculated using the longest estimate times listed. 
2) Chinese Holiday Reminder: During annual Chinese holidays, services from certain suppliers and carriers may be affected, and delivery for orders placed around the following times may be delayed by 3 - 7 days: Chinese New Year; Chinese National Day,etc. 
3) Once your order is shipped, you will receive an email notification from icstation.com
4) Track the order which with tracking number via below links:

YunExpress / Yanwen / China Post: www.17track.net/en
FedEx: www.fedex.com


Customers who bought this product also purchased

DIY 4 Bits C51 Digital Electronic Clock Red LED STC11F02E Chip DIY Kits Soldering Practice Electronic Learning
$4.68
$6.69
31
Colorful Flashing LED Light Love Letter Display Lamp Heart Shaped Electronic DIY Kit Module with Remote Control
$5.94
$8.49
31
DIY Kit RDA5807 FM Radio Receiver 87MHz-108MHz
$11.89
$16.99
30
4-Color LED Music Spectrum Display DIY Kit Voice Controlled 24x8 LED Screen Spectrum Display Light Soldering Kits
$20.99
$29.99
30
CD4511 8-Channel Digital Display Responder 8 Bit Answer Device Suite for Electronic Skills Competition Teaching Training
$2.70
$3.85
31
Welcome Guest Greeting Sensor Switch Module DIY Kit Light Control Greeting Machine DIY Kits
$2.51
$3.59
30
DIY Kit Blue LED Blinking Light Hourglass Shaped DIY Flashing Light Electronic DIY Soldering Kits for School
$3.49
$4.99
31
2000PCS GM5528 5mm Photoresistor, 100mW Bright Resistance, 10Kohm~20Kohm Photoelectric Switch Sensor
$6.99
$9.99
30
Hourglass Shaped LED Flashing Light DIY Kits Simple LED Lamp DIY Electronics Soldering Practice Teaching Kits
$3.49
$4.99
31
XH-M407 XL4016E1 DC to DC Step Down Buck Converter Power Supply Module DC 4V-40V to DC 1.25V-36V
$6.29
$8.99

Sold Out

30
DIY Kit RGB Flash LED Circuit Colorful Christmas Trees LED Soldering Practice Kits Xmas Fun Gift DC 4.5V-5.5V
$6.22
$8.89
31
DIY Kit Red LED Electronic Hourglass Shaped Flashing Light DC 3.3V-5V Funny Electronic Soldering Kits
$3.05
$4.35
30

Your Recent History

DIY Kit Green Yellow Dual-Color Flashing Light Analog Traffic Signal Indicator Electronic Soldering Practice Tranining Kit
$4.61
$6.59
30