Your Shopping Cart Is Empty!
If you already have an account, Sign in.
If you already have an account, Sign in.


Description:
It is a WIFI module based 4 channel (4-way) WIFI wireless switch. It integrates with MCU and button control.
It supports to connect and control 4 home appliances, which can be separately turned on/off by app eWeLink buttons on module. Users can switch among 3 modes: self-locking mode, inching mode and interlock mode.
In self-locking mode, users can turn on/off the 4 connected devices independently. In inching mode, users can turn on connected devices for 1s. In interlock mode, users can turn on 1 device every time, and turn off other devices at the same time.
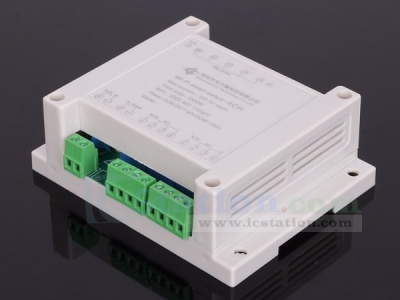
The enclosure supports din-rail mount! (It doesn't included in this package) A DIN rail is a metal rail of a standard type widely used for mounting circuit breakers and industrial control equipment inside equipment rack.
Features:
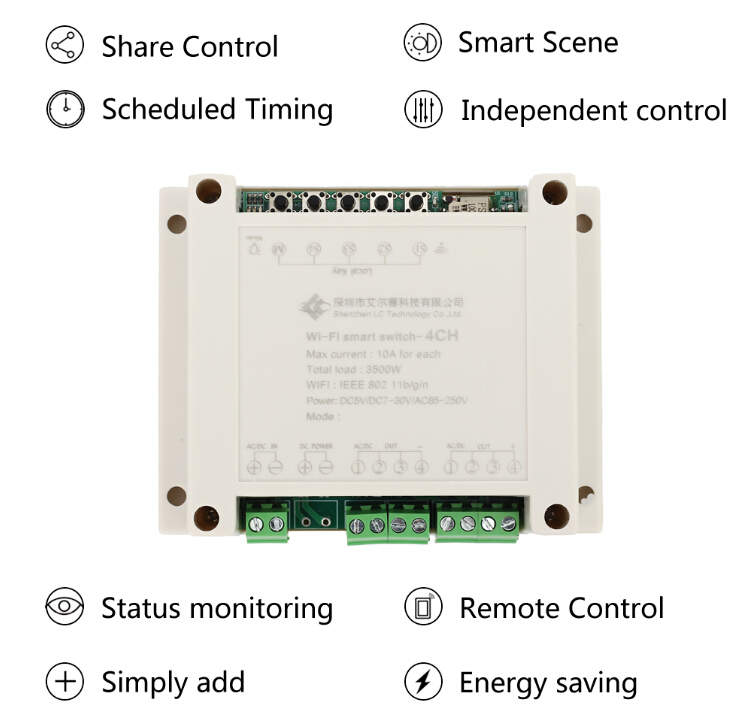
1>. Supports APP control;
2>. Supports button control;
3>. Supports status tracking, home appliances status timely feedback to your App;
4>. Supports remotely turn on or off added devices;
5>. Supports single/repeat/countdown timing tasks;
6>. Supports numerous WIFI smart switches in one account;
7>. Support independently turn on/off 4 home appliances;
8>. Support switching self-locking mode, inching mode and interlock mode;
9>. Support countdown timer and scheduled timer;
10>. Support share control;
11>. Support IOS and Android;
12>. Easy installation, easy handling and can be activated immediately and stably;
13>. APP supports multiple languages;
14>. Support power supply output.
Parameters:
1>. Working voltage: AC 85~250V;
2>. Load voltage: AC 85-250V;
3>. Load current: 10A/channel(max);
4>. WIFI standard: 2.4GHz b/g/n;
5>. Operating Temperature: -20℃~70℃;
6>. Operating Humidity: 5%-90%RH;
7>. Size: 11.5*9.0*4.0cm;
Function:
1>. Scheduled Timing
Users can preset repeat or single timing schedules to turn on/off devices according to your needs. Imagine that the light is off in the evening (10:00 pm) and on in the morning (7:00 am) every day automatically.
2>. Countdown Timer
A countdown timer allows users to turn on/off a device at a countdown time. This feature supports up to 24 hours countdown time. It can be widely applied to devices with battery for charging. Just imagine you have your mobile phone stopped charging after 3 hours countdown time.
3>. Loop Timing
eWelink is the first smart home APP in domestic market to release the powerful loop timing function. A loop timer allows users to turn on/off a device at preset intervals and run for a specified time. With a loop timer, you can make a device launch every 30 minutes and last for 10 minutes each time.
4>. Grouping Function
It allows users to assign all added devices to different groups so that they can easily check and manage the devices. To use this feature, simply click the drop-down menu on the top of device list.
Create a group named ‘My Study Room’, and add all the home appliances in the study room into the group for convenient management.
5>. Smart Scene
The smart scene allows users to use one device to automatically trigger ON/OFF one or more devices. So you can create two scenes named ‘Return Home’ and ‘Leave Home’. As soon as you arrive or leave home, the door is open/closed, lights or other home appliances are automatically turned on/off.
6>. Share Control
Device owners can share control of their own devices to other eWeLink users. Invite your family members to control your smart home together!
Tap on ‘SHARE’ and enter the eWeLink ID you want to share with (either phone number or email address), make sure the person is also online. Once the invitation message is confirmed, he/she will have right to control your devices.
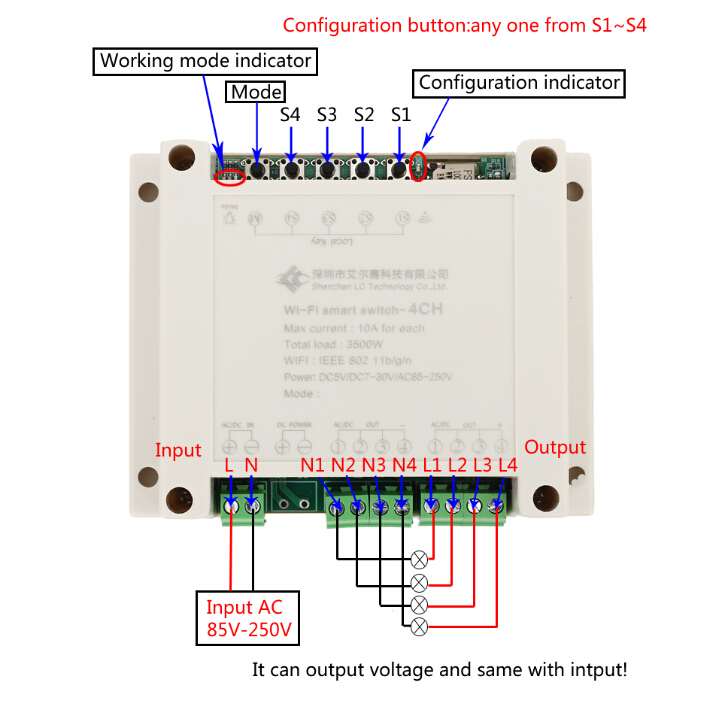
Work Mode:
1>. Change work mode:
The default is self-lock mode.
The LED corresponding to the work mode will turn ON when press button ‘Mode’.
M1:Red LED indicator.Self-locking mode;
M2:Blue LED indicator.Inching mode;
M3:Green LED indicator.Interlock mode.
2>. Self-locking mode:
Control each output separately.4-Channel output relay work independently of each other.
For example, if users turn on CH1, connected device keeps on. If users turn off CH2, connected device keeps off.
For example:Press button CH1,CH1 relay will keep on;Press again,CH1 relay OFF.
3>. Inching mode: It is also lockless mode
Control each output separately.4-Channel output relay work independently of each other.
Users can turn on the connected devices for 1s.
For example, users can turn on CH1 connected device for 1s, then auto-off.
For example:Press button CH1,CH1 relay will keep on for 1s and then CH1 relay OFF automatically.
4>. Interlock mode:
The 4 outputs are related to each other, only one output can work at a time.
Users can turn on 1 device every time, and turn off other devices at the same time.
For example, if users have turned on CH2, then when they turn on CH3, CH2 will be auto-turned off at the same time.
Button Control:
1>. Module can be control by button on module.
2>. Using steps:
Step 1: Connect AC 85~250V power supply on ‘L’ and ‘N’.(Note:Please don’t connect to load before select work module and test.)
Step 2: Press button ‘Mode’ to select working module.
Step 3: Test.E.g press button S2,then output relay CH2(L2/N2) will turn ON,and output LED indicator D7 will turn ON at the same time.
Step 4: Remove power supply and then connect to Load at output terminal.
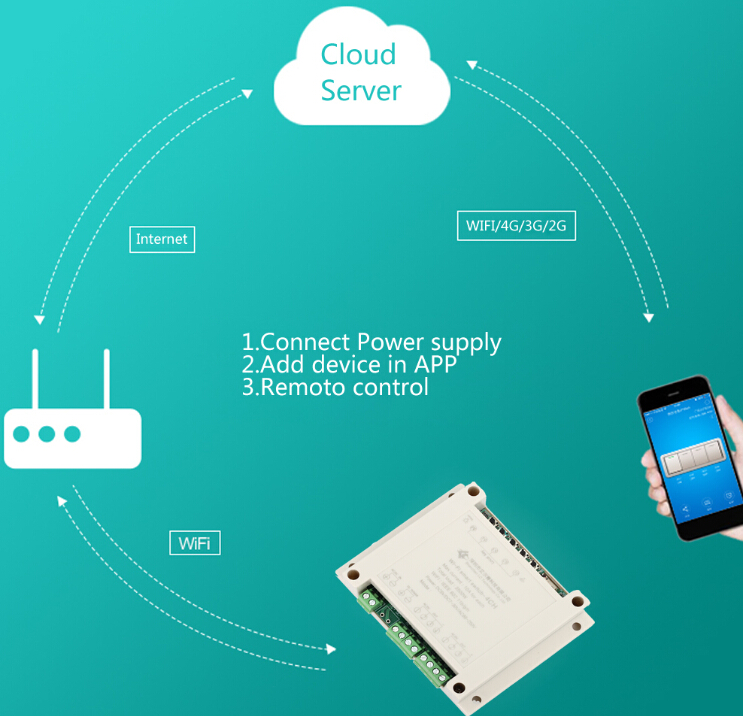
APP eWelink intelligent control:
1>. Module can be controlled by APP intelligent control.
2>. It can Add/Sharing/delete device,setting delay,APP remote control,get work status and so on.
3>. Pairing Steps:
Step 1: Install and register APP eWelink, select the appropriate language.Use can get APP for ‘APP Store’ or ‘Google Play’ or eWelink Official website.
Step 2: Connect AC 85~250V power supply on ‘L’ and ‘N’.(Note:Please don’t connect to load before select work module and test.)
Step 3: Make sure module in the range of WIFI and phone connect to the same WIFI router.
Step 4: Open APP eWelink.
Step 5: Keep press the configuration button any one in S1-S4 for more than 6 seconds.When the LED ‘D5’ starts to flash and then Click ‘Add Device’.
Step 6: Select ‘Touch’ on APP.
Step 7: Input WIFI name and password which phone is connect.
Step 8: Waiting and configuring about 3minute.
Step 9: If the pairing fails,please try it several times.
Step 10: Reset the module device name after connection successfully.
Step 11: Test and set module.
4>. Using steps:
Step 1: Make sure already paired successfully between module and APP.
Step 2: Make sure module in the range of WIFI.
Step 3: Make sure phone have connect to WIFI/4G/3G/2G.Any one the internet.It means phone no need connect to WIFI after paired successfully.
Step 4: Connect to Load at output terminal.
Step 5: Connect AC 85~250V power supply on ‘L’ and ‘N’.
Step 6: Set work mode.
Step 7: Using and control module.
Control Mode Relationship:
1>. It can support three controls simultaneously.E.g user can turn ON CH1 by button,but turn OFF by APP.
2>. APP can get work status if control by button.
WIFI Indicator Status Description:
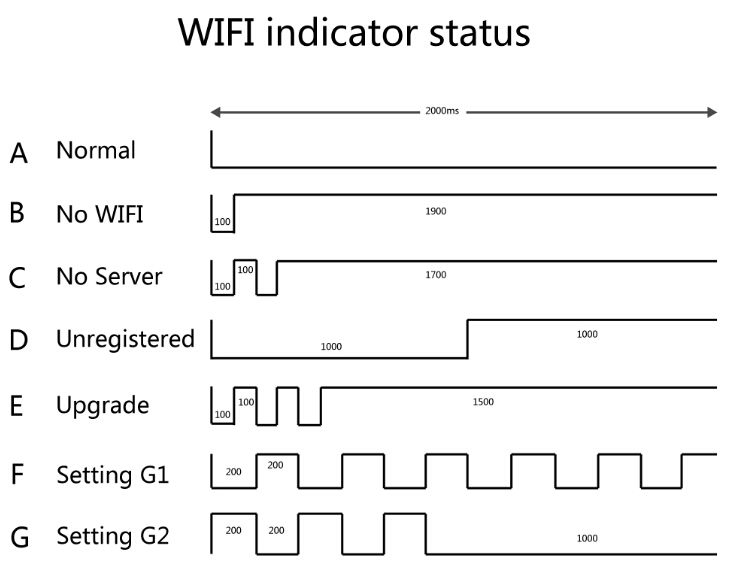
The indicator blinking period is 2 seconds.LED indicator will turn ON when high level and will turn OFF when low level as shown.
A. Normal:The module works normally and it is properly connected to the cloud server. At this point you can control the module via the APP. In any other mode, it is not possible to control the module via the APP.
B. No WIFI:Module cannot connect to router.
C. No Server:The module successfully connected to the router but could not connect to the server.
D. Unregistered:The module is not yet associated with any APP account.
E. Upgrade:The firmware of the module is being updated.
F. Setting G1:The module is in AP mode.Configuration mode is used by module to get the necessary information of the service network that provided by the mobile terminal APP.Including the router SSID, password and server IP, port number, etc.
G: Setting G2:The module is in TOUCH mode.Configuration mode is used by module to get the necessary information of the service network that provided by the mobile terminal APP.Including the router SSID, password and server IP, port number, etc.
Application:
1>. Smart home control.Remote control of household appliances such as air conditioning, electric fans, rice cookers, lights, etc.;
2>. Automatic motor control;
3>. Production workshop intelligent operation;
4>. Intelligent farming control;
Note:
1>. It can output voltage so module can connect to load directly!
2>. At first time when pairing,phone must be connected to WIFI from router.It is not need connect to WIFI after pairing success.
3>. Its power supply is AC and can not provide voltage from DC.
Frequently Asked Questions:
Q1. Why does the relay start working automatically after the power is turned ON?
A: Poor contact,Please remove power supply and reconnect more than once.
Q2. Why can't pair successfully?
A: Please make sure module in the range of WIFI from router.Phone connect to the same WIFI.Second,need try more than once.
Q3. Can it get work status?
A: Yes, APP can get work status.
Q4. Why does APP display OFF and module cannot be controlled after the pairing is successful?
A: Module need inside set after pairing successful about 1-2 minutes.Then check with ‘WIFI indicator status description’ to find reason.Check if your router sets the filtering MAC address.Delete device and re-pair.Use 2.4G router and don’t use others.
Q5. Why can not add device?
A: Close WIFI on phone and waiting for more than 10minutes.Then restart module and re-connect WIFI.Keep module close to router.
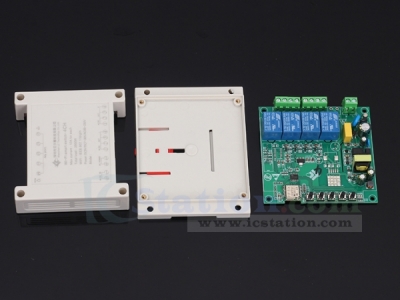
Package:
1>. 1pcs 4CH WIFI Relay Module;
2>. 1pcs Use manual;
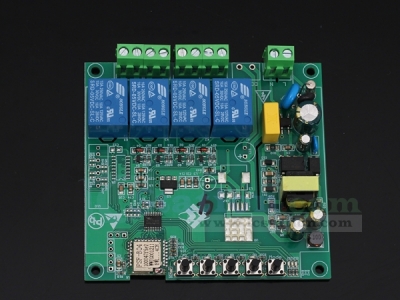
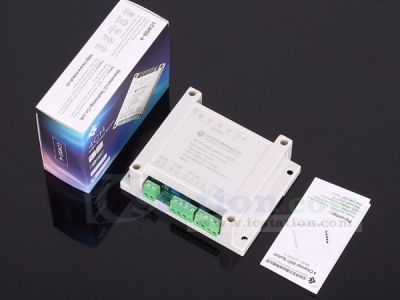
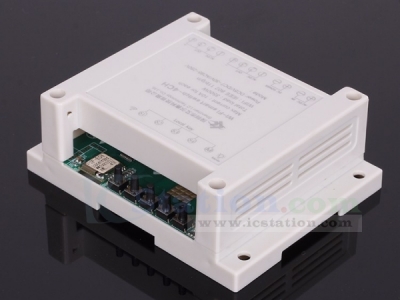
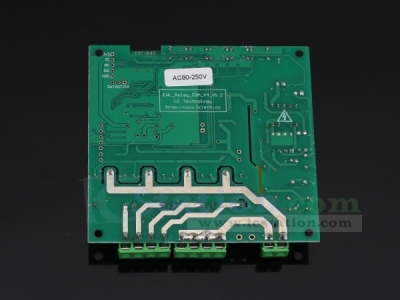
Product Details:
Picture One:
Picture Two:
Picture Three:
Picture Four:

| Quantity | 3+ | 5+ | 10+ |
| Price | $13.80 | $13.60 | $13.20 |
ICStation doesn't accept any form of pay on delivery. Items used to be shipped after payment. Below are the payment methods we can accept at the moment:
1) Paypal Payment
PayPal is a secure and trusted payment processing service that allows you to shop online. PayPal can be used at icstation.com to purchase items by Credit Card (Visa, MasterCard, Discover, and American Express), Debit Card , or E-check (i.e. using your regular Bank Account).

We are PayPal Verified 
2) Bank Transfer / Wire Transfer / T/T
Bank Transfer / Wire Transfer / T/T payment methods are accepted for orders which the total price is up to US$300. The bank will charge about US$50 for the transfer fee if we do the payment in these ways. Feel free to contact us for bank payment details if you need pay via bank.
For other payment method, please contact us at orders@icstation-team.com for more details.